Data Studio Update Part 3
View DB Objects and Attributes
Dean Compher
29 April 2013
In this article I will provide examples of how to do a variety of day-to-day DBA activities in Data Studio. I will discus how to easily gather information about your database and even how to generate an entity/relationship data model diagram to visualize the schema. Examples include how to view objects in the database including tables, indexes, tablespaces and other items and how to drill down to see columns, data types, and physical storage attributes among other things. I will also show the administration tasks like viewing database and instance configurations and how to invoke backup, statistics and other features. You can read more details about all of these features in the Data Studio 3.2 Information Center.
I would say that the most used features in Data Studio are ones used to just look at the objects in your database. For example, I might want to know what tablespace contains a particular index or the data type of a column in a table. Data Studio makes these things easy to do. The first thing to do is to open the Administration Explorer view that is found in the Database Administration perspective. You could also use the Data Source Explorer. As you can see in Figure 1, you can see the available objects to review. Please note that the database, in this case “GSDB”, is also an object that you can explore.
Figure 1. Objects you can see for a database:

You then just click on the object type like “Tables”, “Table Spaces”, “Buffer Pools”, etc. to see the list of those objects. You can add filters to narrow the list shown. For example, you might only want to see tables whose names start with “ADDR” or tables in a particular schema. The list of objects are shown on the right side of the Data Studio window and then you can click on a line to see more information, such at the columns in a table such as what you seen in Figure 2.
Figure 2. Display database objects

From the list objects, you can right click on them to do several things. The menu will change depending on what type of object you are using. Figure 3 presents the options available for the “Data” and “Show” submenus. The Data submenu allows you to view (Browse) rows in the table or will display it and let you change it by choosing “Edit”. Both will display the first 500 rows. The ‘New “Select” Script’ option will generate a select-from SQL with all columns listed. The Show submenu has lots of good options too. For example you can display the indexes for the table selected. Another great option is the “Analyze Impact” choice. It should be used anytime you are considering a change to an object. It will show all of the objects that depend on the object you have selected. For example, if you were to use “Analyze Impact” on a tablespace, it would show you all of the tables, indexes, containers and other database objects that could be dependent on that tablespace. It can also show you the objects upon which this object depends.
Figure 3 pop-up menus from GOSALES.BRANCH table


I have been discussing how to view your tables, indexes and other objects. Using these same menus you can also use views to easily change the objects. You should note that the changes are not implemented as soon as you make them. Instead they are put into a “Change Script” that you can view and either run from data studio or copy into a script and run yourself from your workstation or directly on the database server. With these changes you can make very complex changes and have data studio create the script to preserve all indexes, authorizations, and other dependent objects even when a table is dropped and recreated. This is a very large topic and I will address it in a later article.
Figure 4. Generate DDL for several tables
 Another very useful feature that you will notice in the
main popup menu in Figure 3 is the “Generate DDL…” choice. For this and
some other choices you can select several or even all of the available tables
using CTRL+click or Shift+click before right clicking the group. In
Figure 4 you can see that I chose several tables and then I chose Generate DDL
to generate the DDL that could create the objects in another schema or
database. You can save the script generated into a file of your
choice.
Another very useful feature that you will notice in the
main popup menu in Figure 3 is the “Generate DDL…” choice. For this and
some other choices you can select several or even all of the available tables
using CTRL+click or Shift+click before right clicking the group. In
Figure 4 you can see that I chose several tables and then I chose Generate DDL
to generate the DDL that could create the objects in another schema or
database. You can save the script generated into a file of your
choice.
Create Data Model Diagram
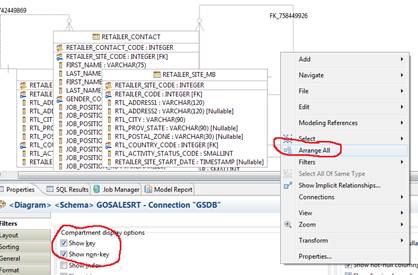
One of the best features for visualizing the relationships between your tables is the ability that Data Studio provides you create an Entity Relationship diagram of your physical database. There are a number of ways to do this, but my favorite is to select the “Schemas” choice from the Administration Explorer and the choose one or a few schemas and then right click my selection, and choose “Show | In Database Diagram” as shown in Figure 5. You could also select just the tables that interest you as shown in Figure 3 and choose Show/In Database Diagram as well. I like showing it for an entire schema, because those tables are usually related.
Figure 5. Reverse Engineer an E/R diagram of your database.

By default, this will show the tables and their relationships to each other, if foreign keys are defined in the database, but no columns or other useful information. To tell Data Studio that that you want to see the columns you need check the “Show Key” and “Show non-Key” boxes in the Properties tab as shown in Figure 5. You can also scroll down in the properties tab to check more boxes to show data types and if the columns are null-able. When you do this you will get a jumbled mess as also shown in Figure 5. However, you can right click in any blank part of the diagram and choose “Arrange All” to put the diagram in an easy to read format with few relationship lines crossing.
Figure 5 Modify E/R diagram
The “Arrange All” option will nicely arrange the objects in the diagram for you. Another useful feature is the fact that you can double click on the tab where the tab name is displayed to make that tab consume the entire window. Figure 6 shows where I double clicked on the <Schema> GOSALESRT – Connection “GSDB” tab after clicking “Arrange All” in the diagram. To put the tab back to normal size, just double click on the tab again. I could then save the diagram to an image file to email to my colleagues on the project and I could print it too. You just right click on a blank part of the diagram and choose the “File” option.
Figure 6. Full size “Arranged” diagram.

Managing the Database
In the paragraphs above I talk about how to view objects in the databases and now I will talk about how to view and administer the database itself. To view the Database Configuration (DB CFG) and perform other database level tasks you just go into the Administration Explorer view and right click the database name. In Figure 7 I have selected the GSDB database. You can also single-left-click on the database name and get the list of databases in the object list on the right. As you can see in Figure 7 there are several options presented from the database menu and a number of these have sub menus, including the “Set Up and Configure” and “Manage Database” choices.
Figure 7. DB Administration “Set Up and Configure” and “Manage Database” Sub Menus


The “Configure” option on the “Set Up and Configure” menu allows you to display and change DB CFG parameters. This submenu also allows you to configure automatic maintenance, transaction logging and to set up HADR. The handiest options on the “Manage Database” submenu are probably the Quiesce and Unquiesce ccommands along with the Manage HADR that allows you to view and change HADR status.
Other useful options on the main menu are the “Generate DDL…” that will generate DDL for all objects in your database similar to the db2look command and the “Backup and Restore” option that gives you and easy menu to configure backup and restore of databases.
These commands are NOT executed when they are chosen. They are only executed when you select the options that you want and then click the “Run” button. You can always view the actual database commands that will be run for these views by clicking the “Preview Command” link that appears on the view. Even if you prefer to run your administration commands at the command line, this is a very handy way to generate the command with out syntax errors that you can paste into your script.
Instance Level Considerations
For most operations that you do from Data Studio, you connect to a database, but for operations that you execute on a DB2 instance (a.k.a DB2 data server) you need to have a connection outside of the instance. For example, if you want to start an instance that is not running, you can’t connect or attach to it to do anything. Therefore, you need connect to the operating system of the server to do that. For Linux and UNIX servers, Data Studio uses SSH to connect. For Windows it tries SSH and if that is unavailable, it tries to use the DAS. SFTP is also used. For more information about these connections please visit the Configuration for Remote Operations page of the Information Center
To view and administer an instance that has been properly configured to communicate with the server you right click on the instance to present a menu. For example, in Figure 7 you would have right clicked “DB2” instead of “GSDB” to see the Instance menu. Options on this menu include choices to start, stop, quiesce and unquiesce the instance as well as a “Configure” option that allows you to view the Database Manager Configuration (DBM CFG) parameters. If you wanted to create a new database you could just right click on the instance and choose the “New Database…” menu option.
This is the third in a series of Data Studio Articles that I am writing. Earlier editions that may interest you include:
Data Studio Update Part 1 – Links for installing, summary of my favorite features
Data Studio Update Part 2: Perspectives, Views and Database Connections – Navigating Data Studio, connecting to your databases.
Data Studio Update Part 4: Changing Database Objects – Generate changes that preserve data and objects.
Data Studio Update Part 5: Query Building and Editing – Ways to create and edit queries in Data Studio.
Data Studio Update Part 6: Query Tuning for DB2 LUW and z/OS – Tune individual Queries.
Data Studio Update Part 7: Find and Tune Bad Queries from the Package Cache – Find bad queries in the package
***
There are many more things that you can view about your instances, databases and database objects and I suggest that you take some time to explore them. Please take a view minutes to click around and see what is available. Please add any features that you really like to my Facebook Page or my db2Dean and Friends Community and help the extended community.