Data Studio Update Part 2
Perspectives, Views and Database Connections
Dean Compher
28 February 2013
In this article, I will discuss some of the basics of how to navigate around Data Studio to get to the functions that you need and how to establish and administer connections to your database. Navigating among the various views presented in Data Studio can seem foreign until you get to know the flow of it and I hope that this article helps with that. Establishing and editing database connection information is different than what you are used to if you do not have experience using Java to connect to your databases. I will show you how to make and edit connection information and compare it to using the DB2 CATALOG commands that may already be familiar to you.
This is the second in a series of Data Studio Articles that I am writing. Other editions that may interest you include:
Data Studio Update Part 1 – Links for installing, summary of my favorite features
Data Studio Update Part 3: View DB Objects and Attributes – View tables, columns, indexes and model diagram.
Data Studio Update Part 4: Changing Database Objects – Generate changes that preserve data and objects
Data Studio Update Part 5: Query Building and Editing – Ways to create and edit queries in Data Studio.
Data Studio Update Part 6: Query Tuning for DB2 LUW and z/OS – Tune individual Queries.
Data Studio Update Part 7: Find and Tune Bad Queries from the Package Cache – Find bad queries in the package
Other useful Links
Getting Started with Data Studio for DB2 e-Book
Which Data Studio Features work for DB2/LUW, Informix, Oracle, DB2/i, DB2/z, and other platforms
Views
Everything that you do in Data Studio is done within a window called a view. Some views are inserted as panes in the existing Data Studio Window and others pop up as free-floating windows. One example of a view is the one called the Administration Explorer that lists the database servers that you have defined. This view happens to present data in a tree structure where you can expand a server and see the DB2 instances it has, and then you can expand those instances to see the databases, and you can expand the databases to see available types of objects like tables, indexes, tablespaces, etc. You can right click anywhere in this tree, and you will be presented with the available actions for the item. For example if you right-click a database, you will see options like “Connect” and “Backup and Restore” -- actions you can take on a database. Then if you click one of those actions from the list another view will be displayed where you can view and/or input options for a particular action. You can also double click on the item to be presented with the default view. For example if you double click the “Tables” entry that displays when you expand a database, then you will get a view that shows a list of tables. You can go as deep as you need to go. Figure 1 shows an example of where I expanded the “localhost” server in the Administration Explorer view down through the “GSDB” database, double-clicked “Tables” which cause the larger view in the upper right with the heading tab called “GSDB” that shows the tables in that database. Finally I single-left-clicked the ORDER_DETAILS table and that opened the “Properties” view in the lower right of the window.
Figure 1. Views:

Some of these views appear when you open the application and others are shown when you click on something like “Tables” to show a list of tables. Some views are called editors because they allow you to change something. An example of this is when you right click a table and choose to export data. In this case an editor window will open that allows you to choose all of the options for creating an export.
Perspectives
Views are grouped together for useful sets of tasks that at are called perspectives. When you open a perspective an initial group of views are displayed that give you a good starting point for a set of related activities. In my article I will mostly use the “Database Administration” perspective that includes a view called the Administration Explorer. This perspective contains the tools that allow you to view and modify instance level and database level information and that allows you to do simple and complex database administration functions. To open the Database Administration perspective, start Data Studio and choose the following options starting with the “Window” option from the list of choices shown across the top of the window:
Window | Open Perspective | Other …
And then choose the “Database Administration” perspective from the list presented to you as shown in Figure 2. Once you have opened the perspective once, you can just click the perspective from the ones shown in the upper right corner of the window. In figure 2 the “Data” perspective is shown n the upper right because I have had that perspective open in the past.
Figure 2. Database Administration Perspective Views:

The Administration Explorer view is great for many administration tasks, but there are also other useful views like the Data Source Explorer view that is part of the “Data” perspective that shows the databases at the highest level in the tree. It also allows you to drill down through schemas and then tables in the tree structure instead of having to display the tables in a different view like the Administration Explorer. Also if you are administering an iSeries database you can only use the “Data Source Explorer”. A perspective is a flexible grouping of views that are presented when you open a perspective. For example, in Figure 2 above you get the Data project Explorer and the Administration explorer views when you first open the perspective. As you open additional views such as you see in Figure 1 above they remain until you shut them down. They even remain after you stop and restart Data Studio. Further, you can drag views to different places in the window as you like. You can also add views to a perspective manually, open new perspectives and customize perspectives from the “Window” option in the menu at the top of the Data Studio window. You can also bring back the initial views in a perspective by choosing the “Window | Reset Perspective” option. For more information on views and perspectives and navigating them, please read Section 1.4 in Chapter 1 of the Getting Started With Data Studio for DB2 e-Book.
Administration Explorer – Creating DB Connections
Next I’ll discuss the Data Administration view, because before you can do anything with databases you need to connect to them. You can do many of these items from the Data Source Explorer too, but I’ll focus on the Data Administration view in this article. Data Studio may pick up some connections that you have cataloged locally on your machine, but you will need to specify connection information for any that are not detected. Data Studio is a Java based application so you do not catalog databases like you do for Control Center, Command Window or other DB2 clients. Even if your databases are cataloged on your workstation, Data Studio will not use the catalog. You must enter the connection information into the tool itself and it saves the connection information for you. You use the same information, but just enter it a different way. Please note that you enter both the instance (node) and database (db) information for each database connection that you create.
|
|
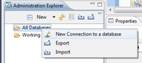
1. Start by right
clicking the 2. Choose “New Connection to a database” from the menu that pops up (“New…” from Data Source Explorer)
|
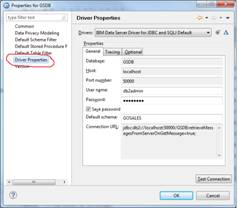
The Connections Parameters view will then be displayed for either the Administration Explorer and the Data Source Explorer. On the left side select the “Local” tab, and then select the type of database that you want to connect to such as “DB2 for Linux, UNIX and Windows”. This will pick the best JDBC driver for that type of database for you, but you can change it if you like by clicking the dropdown in the upper right of the Connection Parameters view. Don’t change this if you don’t know what you are doing. Next enter the information that is needed to connect to the database. In Figure 4 I show how you would create a connection to a database using catalog commands next to the Connection Parameters that you would enter to connect Data Studio to that same database.
Figure 4. Connect to same DB for Data Studio vs. DB2 Catalog Commands

CATALOG TCPIP NODE pure102
REMOTE 172.16.42.102
SERVER 50001
REMOTE_INSTANCE db2lco;
CATALOG DB dtw AT NODE pure102
AUTHENTICATION SERVER;
As you can see, you just need the database name, the IP Address and the port assigned to that instance on the database server. You could also choose to use a host name instead of the IP address if you like. However, you must use the port number. In my experience using the SVCENAME from the DBM CFG will not work. You can find the port number on the database server by looking up the SVCENAME value in the DBM CFG and then looking in the services file on the host for the port number for that value. Also before you save the information you can enter the user name and password and click the “Test Connection” button to the lower right before saving the information. Once you have entered the connection information you can click “Finish” to save the connection. If you don’t want to have to enter your user id and password each time you connect to a database, you can check the “Save Password” button. Once you have created the connection in either Administration Explorer or Data Source Explorer, it will be available in both. As you will notice as you enter the connection fields, the view will begin building the Connection URL and show it in the bottom of the right pane in this view. You can copy this and send it to your Java developers who can use it to connect their applications to your database.
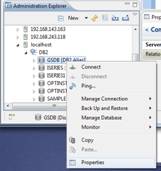
Viewing/Modifying Connections
At some point you will want to review or change the connection information that you entered. This is quite easy if you know what to do.
|
|
|
|
|
This will bring up the Properties for <db_name> view.
|
If you are used to using Control Center locally on servers where you have DB2 databases you know that you don’t need to catalog the local database because it is just there already. Further that connection does not need the IP address and port, because it makes a local database connection. This is not the case when you install Data Studio locally on a machine with a database or databases. You always define the database connections the same way using the IP/Hostname and Port.
Once that you have defined your connections, you can connect to the databases when you want to do things with them. You can be connected to multiple databases at the same time. To connect to a database, just go to the Administration Explorer, and expand the server down to the database that interests you. Right click on the database and choose “Connect” from the pop-up menu and you will be connected.
Each time that you start Data Studio, you are presented with a Workspace Launcher where you can specify a directory for your workspace as shown in Figure 5. I suggest creating a directory with a short name and using that each time. This makes it easier to find files in there that you may create such as SQL scripts. The Workspace directory is also where the connection information that you enter is stored, so if you create your connections while working in one workspace and you tell Data Studio to use a different workspace the next time, then you will not see your connections in the second workspace. This may or may not be desirable depending on how you like to organize your work. You can change workspaces while in Data Studio by choosing “File | Switch Workspace” option.
Figure 5. Choose a workspace

There are even more great things that Data Studio can do for you than listed in this article. If there are any that you particularly like that I did not mention here, please comment on this article in my Facebook Page or my db2Dean and Friends Community and help the extended community.