API Data in your Database
Dean Compher
31 March 2017
Everywhere you go you hear about getting data from APIs – Application Programming Interfaces. API’s really are available all over the place and many are available to call over the Internet. The most common are RESTful APIs and those are the easy to call. In this article, I’ll show how to call API’s from two separate places on the public internet, put the data into tables in dashDB without installing anything and doing no coding. My examples involve collecting weather data and data from my newly installed solar system in to tables in dashDB that could be examined using various BI tools.
In this example, all I use is a browser to deploy and use a few IBM Bluemix cloud services. I’m going to use the Node-Red service in the IBM Bluemix cloud to call the APIs to get data from two separate sources and insert the output into a Cloudant JSON database by just dragging specific types of “nodes” onto the pallet, pasting in the specifics of the API parameters and then wiring them to a Cloudant “node” that puts the data into a Cloudant document store. Many APIs return their data in the JSON format, so there is no coding needed to drop that output into Cloudant. Once you have that data in Cloudant, it is just a matter of turning on the process to have Bluemix replicate the data into tables in dashDB. Once in dashDB you can use the data for all sorts of interesting analytics services. Further, there are free trial versions of these Bluemix services, so you can try this for free. Just make sure to read the terms of the services to make sure you don’t get charged.
In my January Put the Weather in our Databases article, I showed how to call the Weather Company API from cURL on your machine and how to wire Cloudant to dashDB to transform and replicate the data. So, in this article I just refer to that Cloudant replication to dashDB instead of describing it again here. It will also make for an interesting comparison between the two different ways of calling the same Weather Company API.
Before we jump into my example, let’s take a minute to define some terms and services I will use.
|
A particular way of calling procedures over the internet. Click the link to the left for the Wikipedia definition. For those in the database world you can think of an API as a stored procedure in a remote a database. |
|
|
It is an application development environment that is meant to make it easy to wire calls to various procedures/functions together and is frequently used for Internet of Things and applications that call APIs. You can install the open source environment on your own machine or run it in the cloud. In my examples, I will use the Node-Red Bluemix service on the cloud to develop and run my calls to the APIs and put the output into Cloudant which is also called through a REST API. Click the link on the left to see a great description by Jim Lynch. |
Deploy the Bluemix Services
If you do not already have a Bluemix account, then go to bluemix.net and follow the steps to create one. At the time I am writing this article, there is a big button on the page called “Create a free account”. Once you have an account go back to bluemix.net and log in to deploy your services.
Once logged into Bluemix, click the Catalog link to show all the services that can be deployed. You can scroll through the available services or just search using the search box at the top. For example, searching for “node-red” will bring up just a few choices including the Node-RED Starter service.
Next click on the service and you will be presented with a brief overview of what it does. By scrolling down you can see the various plans available and the costs and service level provided. Click the plan you want and then click create and fill in a few boxes with your preferences to create each service. Please note the plan details because you will get charged for some of you exceed usage described or don’t delete the service before your trial period ends. Just be careful. Do this for each of:
o Node-RED Starter
o Weather Company Data
Notice that we did not deploy Cloudant or dashDB services. When you deploy the Node-Red service, give the service a name in the “App name” field (I call mine db2Dean-NodeRed) and leave the SDK for Node.js as Default and the Cloudant NoSQL DB field as Lite for the free trial. When you click the create button you will get a Cloudant database with this service. For the purposes of this example, you do not need to download or install the additional components shown.
The dashDB system will be deployed later. You don’t need to change anything when deploying the weather service.
It is easy to
get lost when drilling down through the Bluemix menus after you deployed your
services. However, you can always get back to the Bluemix dashboard and
start over. You get to the dashboard by clicking the “hamburger” ![]() symbol in the upper left of a
Bluemix window and choosing dashboard from the drop-down. From there
scroll down to see the services that you have deployed and click on the one
that interests you. This is not available when you are in the consoles for the
individual services. In that case you need to click the browser tab for
Bluemix.
symbol in the upper left of a
Bluemix window and choosing dashboard from the drop-down. From there
scroll down to see the services that you have deployed and click on the one
that interests you. This is not available when you are in the consoles for the
individual services. In that case you need to click the browser tab for
Bluemix.
Now let’s get get started with Node-Red. If you are not already familiar with Node-Red, please see the short Getting Started with Node-Red article by Jim Lynch. You do not need to do any of the downloading or is stalling because we already have it deployed in Bluemix.
Next go to your
Node-Red service from your dashboard. Remember you can access the
dashboard from the “hamburger” (![]() ) in the upper left. Click your
Node-Red Instance and then click the “Go to your Node-Red flow editor” button.
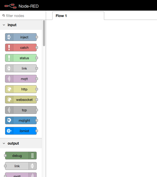
On the flow editor notice that the nodes you can drag onto your flow editor are
on the left. They are grouped by sections including Input, Output,
Function, etc.
) in the upper left. Click your
Node-Red Instance and then click the “Go to your Node-Red flow editor” button.
On the flow editor notice that the nodes you can drag onto your flow editor are
on the left. They are grouped by sections including Input, Output,
Function, etc.
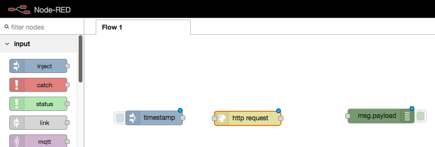
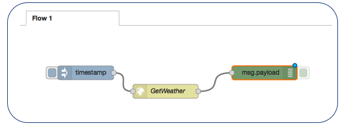
Now drag three nodes onto the pallet shown in the Node column of this table. Different sections can have nodes with the same name. Make sure to get the nodes from the right sections. The name will change for some of the nodes when you drop them on the pallet as shown in this table.
|
Section |
Node |
Name changes to: |
|
Input |
inject |
timestamp |
|
Output |
debug |
msg.payload |
|
Function |
http request |
|
Next we need to configure the http request node to call the Weather Company Data API. Start by getting the weather data API call syntax. Please see the Get Weather Data section in my January article for instructions on how to find the Weather Data service credentials that you will need to call the API. Here are the credentials from my service. Yours will be similar but have different userid and password:
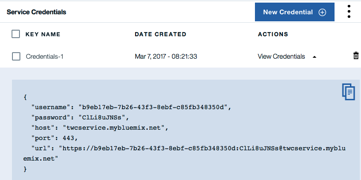
In your favorite editor construct the string that will be used to call the API based on the credentials from the Weather Data API. Note that the first part of the string comes from the URL and port from the credentials. The rest of the information that starts after port 443 is the information you provide to tell the API what data you want returned.
https://b9eb17eb-7b26-43f3-8ebf-c85fb348350d:ClLi8uJNSs@twcservice.mybluemix.net:443/api/weather/v1/location/84065%3A4%3AUS/observations/timeseries.json?hours=23&units=e&language=en-US
Again, see the Get Weather Data section in my January article for more information about how to construct the parameters. In this case, I am requesting the weather for zip code 84065 and getting the past 24 hours of hourly weather observations (hours 0 through 23). This data is returned in JSON format. You may want to change 84065 to your zip code if you are doing this.
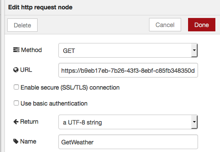
Next paste this string into the http request node by clicking on that node on your palette. Double clicking brings up the panel to enter your information. Choose the GET method and paste the entire string into the URL box, and enter a name like “GetWeather” into the Name box.
Next “wire” the nodes by dragging a line from one handle to the next. When you are done, your palette should look like this:
Next click the Deploy button in the upper right corner and click the debug tab under it:
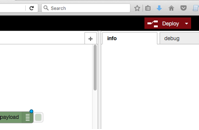
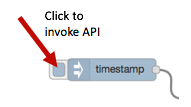
Now you are ready to see if your call to the weather API is working. Just click on the little button connected to the left side of the timestamp node. A JSON document should show up in the debug tab. If there is an error an error message will show up instead.

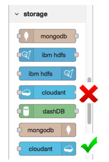
Now we are ready to insert the data into Cloudant. Scroll the node list on the left down to the storage section and drag the cloudant output node onto your pallet. There are two nodes called cloudant. Make sure to get the one with one handle. Hover your mouse over the choices to see the name and make sure to get the output type. Once you drag the correct Cloudant node onto the pallet, double click it to input the needed configuration data as shown below.
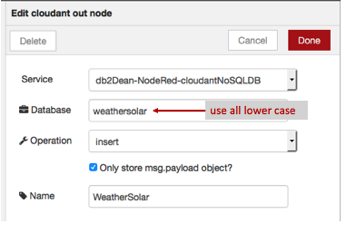
One really nice thing about this Node-Red service is that it comes with a Cloudant service. Complete the configuration of the node. Under Service choose the option that contains the name you chose for your Node-Red service. Choose a name for the database in the Database box. Make sure to use all lower-case letters with no spaces or special characters. I got an error when I tried this with some upper-case letters. You can name the node anything you want. I chose to call both weathersolar. Choose Insert for the operation and check the “Only store msg.payload object?” box. Then click done. If there is something wrong with the information you gave, s small yellow triangle will appear you the cloudant node.
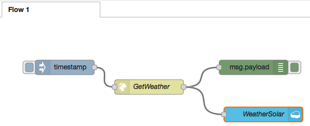
Now drag a connector from the output side of the GetWeather node to the input of the Cloudant WeatherSolar node and click the deploy button in the upper right. Your pallet should now look something like this:
When you click the Deploy button, the service will create a database in the Cloudant service with the name you gave it in the cloudant node configuration. As you may recall, I called mine weathersolar. Wait a minute or two for this to complete and then click the button the left side of the timestamp node to get the weather observations and put it in both the debug tab output and your Cloudant database.
You can now look
at the document in your Cloudant Database. When you started the Node-Red
service from your Bluemix dashboard, it should have opened in a new tab in your
browser. Click on the Bluemix tab to get back to that browser window and
then click the
“hamburger” (![]() ) icon and choose dashboard to get back
to your dashboard. You will now see Cloudant service along with your
Node-Red app and Weather service.
) icon and choose dashboard to get back
to your dashboard. You will now see Cloudant service along with your
Node-Red app and Weather service.

Click the Cloudant service that corresponds to your Node-Red service and on the next page click the LAUNCH button that brings up the Cloudant console. Click the Databases tab on the left and you will see the databases you have including the one created for you when you deployed the Cloudant node.
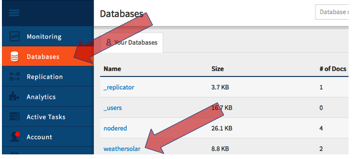
You can then click on the database you created to see the documents you inserted. Each time you click the button to the left of the timestamp node in Node-Red you will get a new document. You will need to refresh the Cloudant tab to refresh the count. To see the contents of a document, just click the little pencil (edit) icon on the left side of the document in the Cloudant tab. If you come to this screen too fast, you may not see your database. Just refresh the tab a few times as it does take a minute or so for the database to be created.
You can call any API you have access to using this method. Some APIs can return data in multiple formats, but if you want to put it into Cloudant then you need to select JSON. Many APIs will return data in JSON. My new solar system uses a SolarEdge inverter to convert the DC power from the panels to AC power and it also sends my production information back to SolarEdge. One of the reasons that I am really happy with this inverter is that I can view my electricity production on cool graphs from an app or on the web. They also let me access my data through a set of APIs! So I decided to drop my solar data into the same Cloudant database using Node-Red. While everyone knows that solar power production is directly related to the amount of sun you get, I though that it would be interesting to see if Watson Analytics could figure that out. It did, and I will show you what it found in another article.
Now I’ll describe how I can get my solar data into Cloudant using Node-Red. Unfortunately, I can’t share my credentials for the API, but I’ll show a representative string that just doesn’t include my API key. You will not be able to get SolarEdge data unless you have one of their inverters, but there are lots of APIs that might give you interesting information and you can call them in a similar way. Just google API for things that are of interest to you and see what you come up with.
A this point I went back to the Node-Red tab. Just as I did for the weather APIs, I drug another http request node from the Function section onto my pallet and connected the inputs and outputs it as shown here:

Notice that I added a connection from the timestamp node to the new node and connected the new node to both the debug and WeatherSolar nodes. Next I configured the http request node as follows:
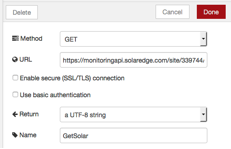
The URL I used looked like this, except that the API key is not correct since I don’t want everyone and his brother accessing my data:
https://monitoringapi.solaredge.com/site/000000/energy.json?timeUnit=HOUR&startDate=2017-02-21&endDate=2017-02-22&api_key=KDOIXKPEPNEKP740JFH8T3
This is an example of an API that uses an API key instead of a user id and password like the Weather Data API does. You just need to read about the requirements for the particular API you are calling. In this API Call I am getting my hourly energy production between 21 Feb 2017 and 22 Feb 2017 and having it returned in JSON format.
Once I configured the node, I clicked Done and then clicked Deploy. Anytime you make any change to the pallet or nodes on it you need to click Deploy to make your changes take effect. With this diagram, I call both APIs and put the output of both into the Cloudant database. They each show up as a different document. The output JSON documents from both nodes also appear in the debug tab. You can go into the Cloudant database to easily see the data in the documents as shown above.
Here is an example from the Cloudant console of part of a weather observation on the left and part of an energy reading on the right:
Figure 1.
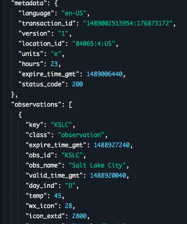
Notice that the data on the weather document is in the Posix format and in GMT time zone and my energy readings are in ISO format and in my local time zone on the right. This would be problematic if I wanted to join these. I’ll discuss that in a later article. You may also notice the “value” is null in the energy production. That is because the readings shown are from midnight to 3:00 am when the sun isn’t shining in my neck of the woods.
You can put as many different document types into the same Cloudant database as you like. I’m just showing an example of two, but there really is not limit.
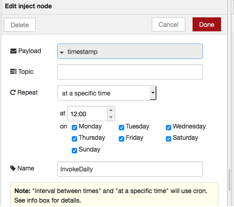
In the above examples I showed you how to get the data manually by clicking the timestamp node. You can automate this collection of data by changing the configuration of the timestamp node. Just double click it and change the interval to anything you like. Here I change it to execute daily.
Please note that one problem with my Solar API call above is that my dates are hard coded. You would need to change that to get a new set of dates each day if you were to run this automatically. I have not looked into how to do that in Node-Red.
Begin Replication of the Cloudant data into dashDB
After you get few records of each of type into your Cloudant database you are ready to begin replicating that data to dashDB. The really interesting thing here is that with a few clicks, you can have Cloudant deploy a dashDB data warehouse database, create the tables based on the weather JSON documents in Cloudant, replicate the data from Cloudant to the tables and continue sending updates as they show up in Cloudant. This all described in the Load JSON Data from Cloudant into dashDB instructions with these few changes:
· In step 1 where it says log in to your Cloudant dashboard. Instead go to your Cloudant console by clicking the Cloudant Service in your Bluemix dashboard as you did above.
· In Step 4 where it says to click “Warehousing” tab, instead click the “Analytics” tab. The tab has been renamed.
· Make sure to skip step 5 and go to step 6 since we are creating a new dashDB warehouse and not a DB2 warehouse. Then click the dashDB button because we are creating a dashDB warehouse.
· In step 8 I used dash_twc for my warehouse name.
· In step 9 use twc for your Cloudant database (or the name you used) instead of the names shown in the instructions.
Once you tell Cloudant to create the warehouse, it can take a few minutes. Watch the status as described in the instructions until the dashDB deployment and replication is complete. Once complete you can explore the table structures and browse data from the dashDB console as described towards the end of the Load JSON Data from Cloudant into dashDB instructions.
Click on the
Bluemix tab and then click the “hamburger”
(![]() ) icon and choose dashboard to get back
to your dashboard. A dashDB service will now be available in addition to
the others. Click it to get into the dahsDB console where you can browse
your tables and the data in them.
) icon and choose dashboard to get back
to your dashboard. A dashDB service will now be available in addition to
the others. Click it to get into the dahsDB console where you can browse
your tables and the data in them.
***
I’ve now showed you how to call API’s over the internet and get that data into dashDB, a relational database. From there you could export the data or use it from other cloud services. In an upcoming article I will discuss some possible scenarios for doing just that. For example, I did a quick search for “public healthcare api” and got lots of results including this healthcare.gov page that describes an API for getting government health care information and a 100 Healthcare APIs page with 100 APIs, some of which are callable by the public. While this is not “production ready”, it is and easy way to collect some data from possibly interesting APIs with little effort. If you try something interesting in this area, please share them on my Facebook Page or my db2Dean and Friends Community along with any other comments you may have.