Put the Weather in your Databases
Dean Compher
30 January 2017
There are all sorts of things organizations would be able to do if they could add weather data to their databases. This could be anything from adding weather data to existing applications and reports to adding the ability to find correlations between weather and significant trends in your existing data and then using weather forecasts to predict those trends. These trends could be increased or decreased sales of particular items, attendance at events, medical clinical visits and many other things that are of interest to you. A more mundane use could be to show a customer service agent the current weather conditions at the caller’s location. In this article I will show you how to get weather observations and forecasts into your data warehouse with little scripting. Best of all you can try it for free.
I will discuss how to deploy the free edition of the Weather Company Data service in the IBM Bluemix service, how to call the APIs it provides to get different types of data like observations and forecasts and how to get that data into relational tables using Cloudant and dashDB free editions and finally how extract the DDL and data. This is a great way to get some weather data into your databases at no cost and with little effort. Once you get the data into your warehouse or other database you can experiment with it and verify that there is value. Once that is verified you can then proceed with buying additional services and develop a more robust way of replicating the data into your warehouse.
What we will deploy or install:
· Bluemix.net cloud services
o Weather Company Data
o Cloudant NoSQL DB
o dashDB
· add cURL to your workstation if you don’t already have it
· a workstation with IBM Data Studio, Toad, or other DB Admin tool installed
· a database where you can add tables for weather data.
Here is an outline of what we will do
|
Create a Bluemix account if you do not already have one, and deploy the Weather Data Service and the Cloudant Service. |
|
|
We will use the cURL utility on your workstation to get weather data and insert it into Cloudant. |
|
|
Call the weather APIs from your workstation. |
|
|
Insert the weather data you get into Cloudant. |
|
|
With just a few clicks you can tell Cloudant to create a dashDB database, create the tables based on the weather data, and begin replicating the data to dashDB. |
|
|
Discuss how to extract the DDL from dashDB and use it to implement the tables in your favorite database and then export the data from dashDB for loading into your database. This section also describes how to get IBM Data Studio and install it, if you do not already have a database administration tool, or to get the dahsDB drivers for your administration tool. |
These are typical cloud data services. As such new features are being added frequently and the screens are changing so you may notice different screen configurations than I show here as time goes on.
Deploy Bluemix Services
If you do not already have a Bluemix account, then go to bluemix.net and follow the steps to create one. At the time I am writing this article, there is a big button on the page called “Create a free account”. Once you have an account go back to bluemix.net and log in to deploy your services.
Once logged into Bluemix, click the Catalog link to show all of the services that can be deployed. You can scroll through the available services, narrow the search by clicking “Data and Analytics” under the Services heading on the left or just search using the search box at the top. For example, searching for “weather” will bring up just a few choices including the Weather Company Data service.
Next click on the service and you will be presented with a brief overview of what it does. By scrolling down you can see the various plans available and the costs and service level provided. Click the free plan and then click create and fill in a few boxes with your preferences to create each service. Please note the plan details because you will get charged for some of you exceed usage described in the plan. Just be careful. Do this for each of:
o Weather Company Data
o Cloudant NoSQL DB
o Do NOT deploy dashDB yet. We will do it later.
It is easy to
get lost when drilling down through the Bluemix menus. However, you can
always get back to the Bluemix dashboard and start over. You can always
get to the dashboard by clicking the “hamburger” ![]() symbol in
the upper left of a Bluemix window and choosing dashboard from the drop
down. From there scroll down to see the services that you have deployed
and click on the one that interests you. This is not available when you are in
the consoles for the services. In that case you need to click the browser
tab for Bluemix.
symbol in
the upper left of a Bluemix window and choosing dashboard from the drop
down. From there scroll down to see the services that you have deployed
and click on the one that interests you. This is not available when you are in
the consoles for the services. In that case you need to click the browser
tab for Bluemix.
Add cURL and DB Administration tool to your Workstation
In this article I discuss doing most of the work on your workstation because for people in most organizations, it is easier to connect to resources on the public internet than from servers. My goal for this article is to show you how to get weather data into your database as easily as possible and getting a security exception to connect from even a test server can frequently be difficult. Once you have verified that it is worthwhile to get IBMs weather data into your database then you can make the process more efficient.
Install cURL on your workstation if you don’t already have it. cURL is a command line tool that allows you to call REST APIs. This means that you can format what looks like URLS i.e. http://www.db2dean.com along with some commands like GET or POST to get tell the server on the other end what you would like to do. If you are only vaguely familiar with what an API is you can think of it like a stored procedure call in a database. It is a program you can call remotely that does something on a remote system such as retrieving data or updating data.
cURL must have come with my Mac because I don’t remember installing it, but you definitely need to install it on Windows workstations. It is a free download. I downloaded it from http://curl.haxx.se/download.html for my Windows VM. Once on the cURL page, just scroll down to the section with your operating system. There is really no install. You just unzip the compressed download file and you can execute the command. It does make it easier if you add cURL to your path so you don’t need to reference the full path name each time you execute it. See this stackoverflow article on how to do that. I added the path “C:\x\curl-7.46.0\I386” since I unzipped cURL in the \x directory and am using a Windows 7 workstation running on an Intel x64 processor. The examples I will show here will be Windows based because I can install both cURL and IBM Data Studio, and make connections to dashDB and my local database.
Get Weather Data
I will now discuss how to get the weather data. This works by using cURL to call the API that interests you, and getting the data back. Just as with the data returned from a Windows or Linux command, the data comes back from cURL in a stream to your display unless you redirect it to a file. After the initial test I show below, you will send the output to a file and then insert the contents of that file into Cloudant. The data comes back in a JSON format in plain text. A description of the Weather Company Data service, along with descriptions of the APIs and instructions for calling along with examples them are on the Weather Company Data documents page.
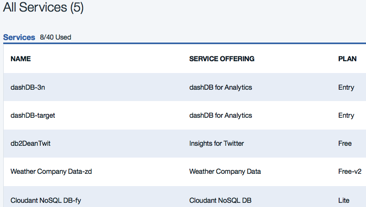
To be able to make the API calls you need to get your credentials for the Weather Company Data service APIs. To do that go to your Bluemix dashboard as I discussed earlier and scroll down to the services list. Mine looks something like this:
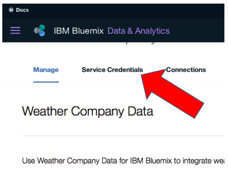
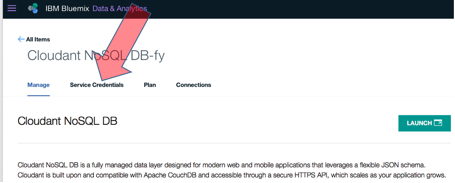
Click on the Weather Company Data service and on the following page click Service Credentials and then “View Credentials” to get your credentials.
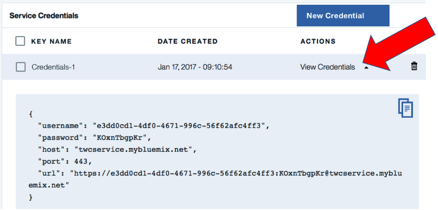
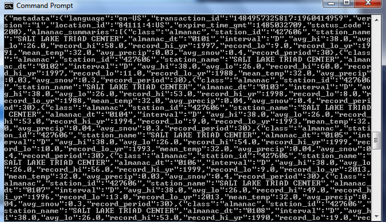
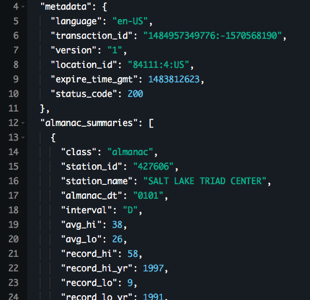
Using the credentials and service instructions you can construct a command for the almanac data (record highest, lowest temperatures, etc.) for July 1 like this:
curl -X GET -u e3dd0cd1-4df0-4671-996c-56f62afc4ff3:KOxnTbgpKr https://twcservice.mybluemix.net:443/api/weather/v1/location/84111%3A4%3AUS/almanac/daily.json?start=0701^&end=0701
… and get the following results shown in Figure 1.
Figure 1. Example cURL command and output.
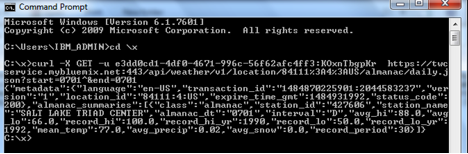
Notice how I copied the user id and password from the credentials screen to the curl command after the –u symbol. Also notice that near the end of the command you see this syntax: “…0701^&end=0701”. The ^ symbol before the ampersand is a Windows syntax to escape the ampersand. You would not use the ^ on Mac or Linux – you would use the backslash instead if executing this command at the command line. On my Mac, I noticed that I had to remove the back slash (\) when running the command from a shell script.
For all of the calls you must provide a location either with longitude and latitude or a postal code. Most of the examples in the documentation use long/lat, but zip codes are easier for me so I use the zip code of the Salt Lake City IBM office of 84111 in my examples. The format for zip codes has some additional parts, so the actual string for my postal code is “84111%3A4%3AUS”. As far as I can tell the “%3A4%3AUS” is the string you will use for all US zip codes.
Here are some other examples of API calls that could be made on a Windows machine. Just replace the ^ character with \ character for other operating systems.
Get the hourly observations for past 24 hours (from hour 0 to hour 23) for zip code 84111:
curl -X GET -u e3dd0cd1-4df0-4671-996c-56f62afc4ff3:KOxnTbgpKr https://twcservice.mybluemix.net:443/api/weather/v1/location/84111%3A4%3AUS/observations/timeseries.json?hours=23^&units=e^&language=en-US
Get the hour by hour forecast for the next two days for zip code 84111:
curl -X GET -u e3dd0cd1-4df0-4671-996c-56f62afc4ff3:KOxnTbgpKr https://twcservice.mybluemix.net:443/api/weather/v1/location/84111%3A4%3AUS/forecast/hourly/48hour.json?units=e^&language=en-US
There are a number of parameters to these API’s that I did not show as well as additional APIs. Make sure to review the Weather Company Data documents page to see what else is possible.
It should also be noted that these examples are for running the commands at the windows command line. If you put these same commands into a windows batch file, the you also need to escape the percent sign with another percent sign. So anywhere you see the “%” symbol, replace it with “%%” when running it in a bat file. On Mac and Linux, you may not need the slashes at all when running the command in a shell script.
Insert this data into Cloudant
Continuing my story, I want to begin capturing hourly conditions so that I after enough time has elapsed, I can see what patterns in my data are correlated with particular weather conditions. To do this I could run the observations API once per day at the same time each day to get the preceding 24 hourly observations. I will put these 24 hourly observations into Cloudant. It is a JSON store and quite easy to insert the JSON documents produced by the weather APIs. I ultimately want the data in my own database, and once the data is in Cloudant it is very easy to get it into a relational format. You can make arrangements with IBM to purchase historical observations in bulk, but here we are doing it free and easy.
First I run my observations command to get the past 24 hours of weather observations, redirecting the output into a file called obs.json:
curl -X GET -u e3dd0cd1-4df0-4671-996c-56f62afc4ff3:KOxnTbgpKr https://twcservice.mybluemix.net:443/api/weather/v1/location/84111%3A4%3AUS/observations/timeseries.json?hours=23^&units=e^&language=en-US > obs.json
Interesting enough, Cloudant also uses a REST API so you can add your observation data from the obs.json file (using your credentials instead of mine) as follows:
curl -X POST -u 11a2085d-7c07-4cec-973b-4db905c6c3c0-bluemix:96d7cb9101e6738968a295553e2a2f61c151c2a15a0223c73bfcfbe533002883 https://11a2085d-7c07-4cec-973b-4db905c6c3c0-bluemix.cloudant.com/twc -H Content-Type:application/json -d @obs.json
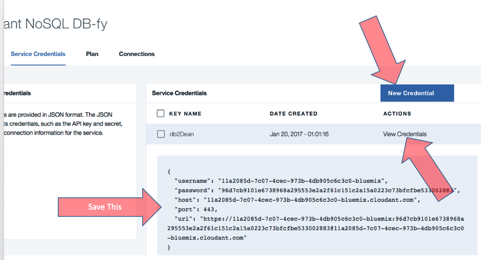
As with the weather service API, you must get your connection information and credentials for your database from your Cloudant service. You will also need to create a database in the service. To start go to your Bluemix dashboard and click on the Cloudant service as you did for the weather service earlier. Now get your credentials by clicking the Service Credentials link:
On the Service Credentials page click the New Credential button edit the name, leave everything else blank and create the credential. This puts you back on the Service Credentials page, where you click “View Credentials” and save the information in the drop down.
Figure 2. View Cloudant Credentials.
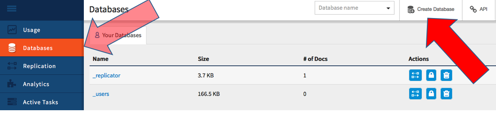
Then click the “Manage” link to get back to the first Cloudant page and press the Launch button to get into your Cloudant dashboard. Then click the Create Database button, enter a name and press create. For this article I created a database called “twc”. Then click the Databases option on the left to view your new database.
Then enter the name you want for the database and click create. For this article I created a database called “twc”. At this point you are ready to create your own command to insert your weather file (obs.json) into Cloudant. Note that I got the credentials from Figrue 2 and where I placed the username twice and password once in the command below. Also note where I used the database “twc” that I created.
curl -X POST -u 11a2085d-7c07-4cec-973b-4db905c6c3c0-bluemix:96d7cb9101e6738968a295553e2a2f61c151c2a15a0223c73bfcfbe533002883 https://11a2085d-7c07-4cec-973b-4db905c6c3c0-bluemix.cloudant.com/twc -H Content-Type:application/json -d @obs.json
Even if you just want to make it easier to view the output of the weather API calls, putting it into Cloudant can be helpful because you can see the JSON formatted by going into your database on the Bluemix Cloudant Console, drilling down into the database and then opening the documents. Compare the two views of the same output of observation data and see what you like better:
There are also JSON viewers and editors that you can download from the web as well.
Begin Replication of the Cloudant data into dashDB
After you get few records of each of type of weather data (forecasts, observations, etc.) into your Cloudant database you are ready to begin replicating that data to dashDB. The really interesting thing here is that with a few clicks, you can have Cloudant deploy a dashDB data warehouse database, create the tables based on the weather JSON documents in Cloudant, replicate the data from Cloudant to the tables and continue sending updates as they show up in Cloudant. This all described in the Load JSON Data from Cloudant into dashDB instructions with these few changes:
· In step 1 where it says log in to your Cloudant dashboard. Instead go to your Cloudant console by clicking the Cloudant Service in your Bluemix dashboard as you did above.
· In Step 4 where it says to click “Warehousing” tab, instead click the “Analytics” tab. The tab has been renamed.
· Make sure to skip step 5 and go to step 6 since we are creating a new dashDB warehouse and not a DB2 warehouse. Then click the dashDB button because we are creating a dashDB warehouse.
· In step 8 I used dash_twc for my warehouse name.
· In step 9 use twc for your Cloudant database (or the name you used) instead of the names shown in the instructions.
Once you tell Cloudant to create the warehouse, it can take a few minutes. Watch the status as described in the instructions until the dashDB deployment and replication is complete. Once complete you can explore the table structures and browse data from the dashDB console as described towards the end of the Load JSON Data from Cloudant into dashDB instructions.
Extract DDL and Data From dashDB
You are now ready to connect your favorite database administration tool to the dashDB system to get the DDL and export weather data. I will use IBM Data Studio which you can download from the dahsDB console under the “Downloads” tab. If you already have a database administration tool that you like, then use it.
If you do not already have a database administration tool, then install IBM Data Studio or your favorite database administration tool like Toad that allows you to connect to databases, export DDL and export and import files to databases. You can get the IBM Data Studio at no charge from the dashDB system you deployed. You can also get the dashDB drivers there if you are using another administration tool. Just log into your bluemix.net account and navigate to your dashboard. On the dashboard scroll down to the services section where you will see your dashDB and other services. Click on the dashDB service and then “Open” to open the console. On the Console click “Downloads” on the left menu and then choose “Database administration software” for Data Studio or “Drivers and command-line client” for drivers.
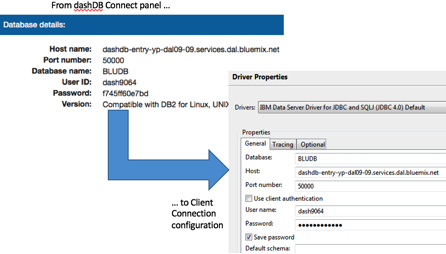
You can either enter your dashDB system from the “View in dashDB” link as described in the Cloudant to dashDB instructions or you can go to the Bluemix dashboard as described earlier where you will now see a dashDB service under services along with your Weather and Cloudant services. Just click on the dashDB service and then click Launch. From the dashDB console you can get the connection information from the “Connection” tab in the menu as described in my Connecting to dashDB article. Here you can see the dashDB Connect information on the left and the Data Studio connection properties I set on the right.
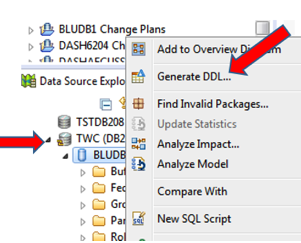
Here I show some screen shots of capturing DDL and creating an export from Data Studio. In the second capture, notice how nicely the replication named the tables such as TWC_OBSERVATIONS based on the Cloudant document tags.

For more information on Data Studio, please see my series of articles on the topic starting at Part 1. Once you extract the DDL for the weather tables, you can edit them for your particular database then create the tables. Then you can export the data from dashDB and load it into your particular database using its native import or load utilities. The dashDB export has a number of formats, but you will likely want to use the delimited format since that is useful for most import utilities.
***
If you think of interesting ways you could use weather in your database, please share them on my Facebook Page or my db2Dean and Friends Community along with any other comments you may have.