Virtualize Files on Remote Servers
Dean Compher
30 March 2021
One of the more interesting features of Data Virtualization is its ability to make files on remote servers appear as relational tables without copying them to the Data Virtualization system. Once virtualized, these files appear as virtual tables along with virtual tables built on tables from actual databases. This makes it easy to use files from a variety of servers in your network or cloud in many different applications without copying those files each time you need the data. Instead you configure the connectivity to each file server once and then any client of DV can see the files you permit them to see. In this article I will show how this can be done.
Before I jump into how to configure connectivity to files on your various servers, I thought that it would be helpful to expand on what I’m discussing. In Figure 1 you can see a simple diagram of how Data Virtualization can make tables and files from various servers appear as tables in one database.
Figure 1. Virtualized Tables and Files
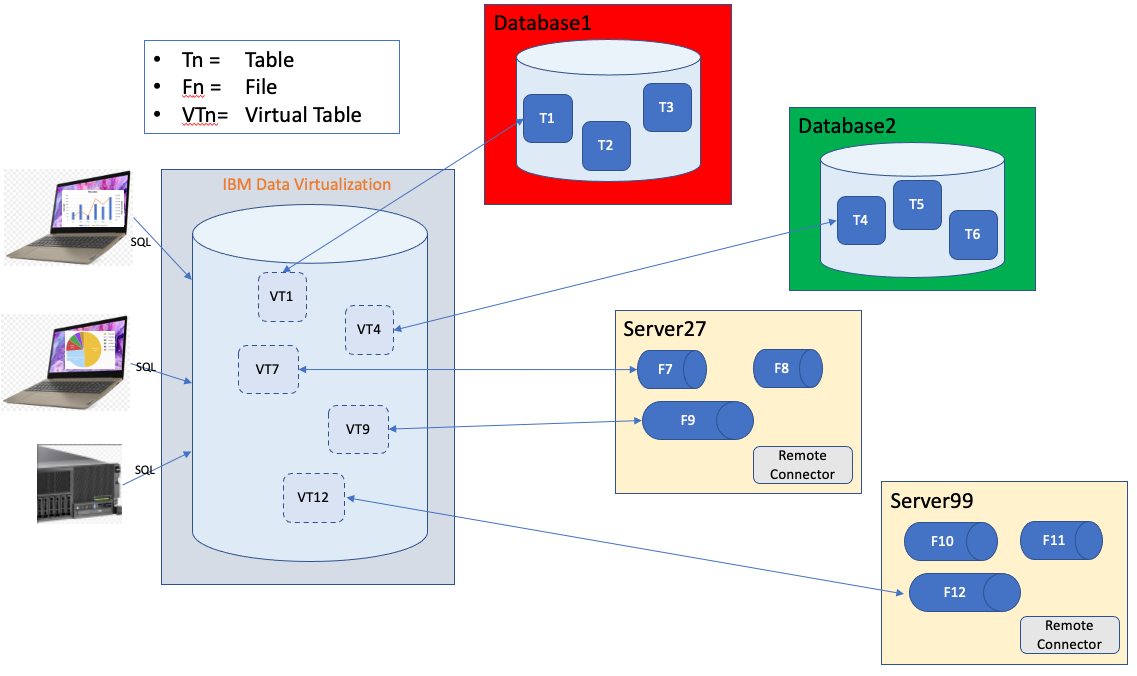
In Figure 1, there are clients on the left side of the diagram connecting to the Data Virtualization database using their favorite IBM Data Server client or driver. They see 5 tables (virtual tables) that they can query either individually or by joining multiple tables. To the applications these virtual tables appear as any other table in a relational database. It doesn’t matter that two of these virtual tables are built on tables in other physical databases and three are built on files existing on remote servers. Also of note in this example is that not all tables and files have been made available to query. The administrator can connect a source, but can selectively determine which tables or files to make available through the virtualization. I describe this process in my earlier Data Virtualization article.
As of Cloud Pak for Data version 3.5, Data Virtualization can virtualize three types of files:
· CSV – Comma Separated Values
· TSV – Tab Separated Values
· Microsoft Excel Files (with single or multiple sheets)
Additional file types are planned to be included in the DV in future releases.
Whereas relational databases already allow clients to connect to them on a certain port and fulfill requests made by a data manipulation language, servers with only files on them frequently don’t have anything like that. So to allow that access to those files, you need to put an agent provided by DV on that server that listens on a port and fulfills requests made by the Data Virtualization server. This agent is called the remote connector. All communications between DV and the remote connector are encrypted with TLS/SSL.
Remote connectors can be installed on machines with these operating systems:
· Linux
· Windows
· Mac
The high-level steps for installing and using a remote agent on your file server is as follows:
1. Verify prerequisites on the remote server
2. Modify the remote server for any prerequisites not already met
3. Verify network connectivity between DV and your remote server
4. Create and download the remote connector installer using the DV console
5. Copy the installer script to the remote server
6. Run the installer on the remote server
7. Define a gateway configuration using the DV console if needed
8. Virtualize files and grant access to the virtual tables
The prerequisites needed on the server include IBM Java 8, cURL, Netstat and TAR and are defined in detail on the Installing Connectors Knowledge Center page. Once you meet the prerequisites, check network connectivity from the remote host to your DV cluster. An easy way to do this is to ping your cluster. For example if you use this address in your browser to log into your DV console “https://icpd-zen.sbpoc05.svl.ibm.com/zen/#/homepage” then you could run “ping icpd-zen.sbpoc05.svl.ibm.com” assuming your remote server has DNS access to resolve the host name. While on the remote server, it is also a good idea to figure out where IBM Java is installed and where you want the remote connector to be installed. The default port for the remote connector is 6414, but you can choose any port you like. Further you will want to ensure that the DV system can communicate to your remote server using the port you choose. Getting the networking and firewall configured is typically the most challenging part of using a remote connector.
IBM Java 8 is a free download and you can get it from https://www.ibm.com/support/pages/java-sdk-downloads-version-80.
Specific instructions for generating the remote connector installer script are on the Installing Connectors Knowledge Center page, including instructions for doing things like changing memory settings as well as starting and stopping the agent. As noted on this page, make sure to install the remote connector using a user id with existing access to the data files you want to virtualize or configure operating system groups for the user and files to ensure access. Then as stated in the instructions, navigate to the DV Data Sources page and then click the arrow next to the “Add new data source” button and choose remote connector. Complete the information requested and generate the installer script. Make sure to note the port being used for later use. Then copy that script to your server and run it according to the instructions. You can copy/paste the script or download it and copy the file to your server. Interestingly, one of the things this scrip does when you run it on the remote server is download the actual software for the remote connector from your DV system. So if the install script can’t connect to your DV cluster then the install will fail.
Installing the remote connector also starts it if all goes well with the installation. To verify that the remote connector is up and running on Linux you can run this command:
ps -ef | grep -i gaian
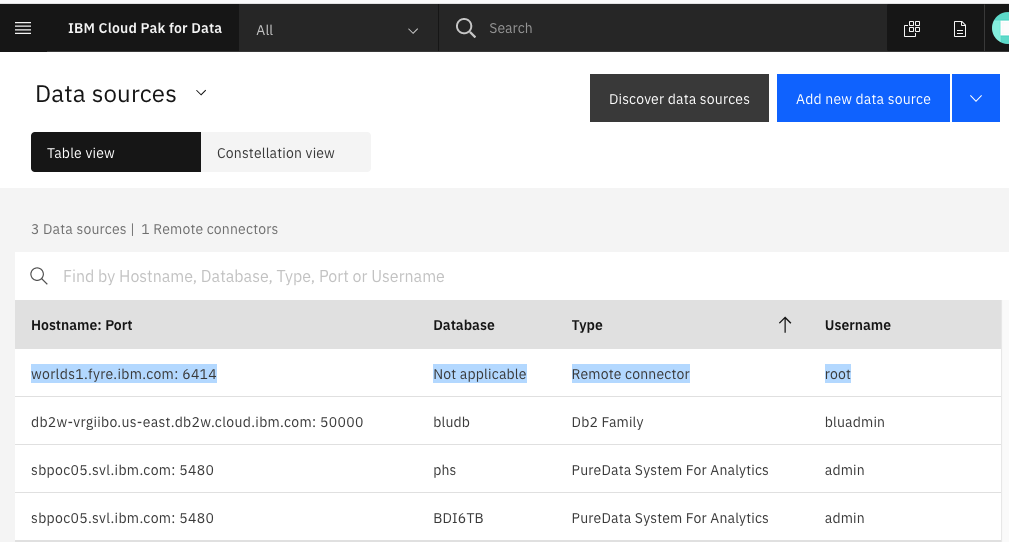
When you have verified that your remote connector is up and running go back to the Data Sources window in DV and refresh the browser. You may see your remote server in the list of sources. Figure 2 shows an example of my system connected to one server (worlds1) with a remote connector and three databases.
Figure 2. DV Data Sources including a remote connector
If you don’t see your remote connector in the list then you need to do some network configuration as discussed in the Network Requirements page. In my case the remote connector showed up after I ran the DEFINEGATEWAYS stored procedure discussed in the requirements page. You will need the port number used when you generated the remote connector install script. To run the procedure I went to the SQL editor in DV console and ran this command:
call DVSYS.DEFINEGATEWAYS ('9.30.207.156:6414')
where the IP was the IP address of the server and the port was the one I specified when creating the remote connector. A host name can be used instead of the IP address. If that doesn’t work, then the Network requirements page has several other items you may need to perform.
To start or stop the DV agent on Linux, log into the server and on the command line navigate to the directory where you installed the agent and run one of these commands:
Start the agent:
nohup ./datavirtualization_start.sh &
Stop the agent:
./sysroot/killGaianServers.sh
Virtualize files
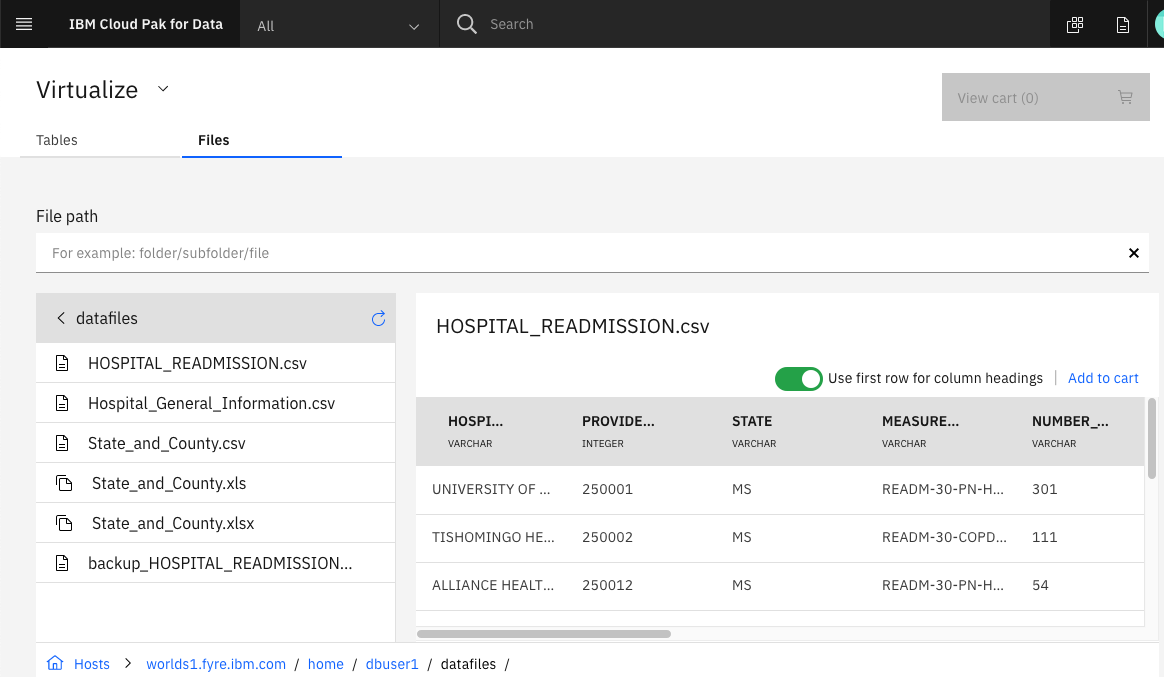
Once you have established the connection to the remote connector from the DV console, you then need to “virtualize” the files to make them available to other users. This is typically done by a DV administrator. The process is similar to virtualizing relational tables as discussed in my earlier Data Virtualization article. Just as you do to virtualize tables, you choose the Virtualize option from the DV menu, but then choose the files tab near the top of the window to begin the process as described on the virtualizing files knowledge center page. It is interesting to note that when you select one of the remote connections you will be shown the directories starting at root and you will drill down to the subdirectory containing the files you want to virtualize. Only files with the extensions of csv, tsv, xls or xlsx will be shown. Even if a file is in CSV format, but has some other extension like “del” the DV console will not show it. As the administrator you can then click on any file shown and get a preview of it. You can then add it to the cart and virtualize any files you selected.
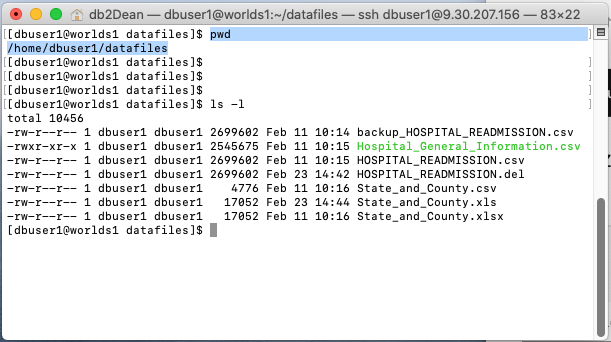
Figure 3 shows both a view of the files from the perspective of logging into the server using SSH and being in the directory with the files, and a view of that same directory from the perspective of the DV Console. In the console you will notice that on the left you only see files with the recognized extensions, where in the SSH window you can see all of the files. In the console I have clicked the HOSPITAL_READMSSIONS.csv file so a preview of that file is available in the right panel.
Figure 3. Comparison of server and console views of the files
After you virtualize files you can see them in the My virtualized data window. At this point, you can do anything with the file virtual tables that you can with virtual tables based on tables. For other users to query your new virtual tables, you will need to grant access to the file-based virtual tables as you would with the table-based virtual tables. You can do this as described in my previous articles: Protecting your Virtual Data and Data Protection Rules for Data Virtualization. If you want to make the queries faster, then you can cache all or part the virtual table in DV as described in the Adding data caches Knowledge Center article.
Some possible use cases include:
- Use files in a variety of servers without copying the files them.
- Explore files using SQL without load/import.
- Make it easy to join files with relational tables or other files.
- Have one place to manage access to files scattered throughout your organization.
***
In this article I wanted to show you how you can virtualize files to make them available to a variety of applications while not making copies. If you can think of other uses, please tell us about them on my db2Dean Facebook Page and share your thoughts about them.