Installing and using Optim Designer
For Information Life Cycle Management Tools
Jody Hair
27 March 2012
The management and use of IBM InfoSphere Optim Information Life Cycle Tools has moved to the eclipse environment. With this move, Optim’s capabilities have been enhanced to provide greater integration and ease of use. Optim Designer is now the front-end development and management interface for the Optim tools. The Designer interface includes data modeling through IBM Information Data Architect, the ability to import and export metadata models, data service creation, data service publishing, and access to all the standard Optim functions.
The Designer interface is a new environment for a lot of Optim users. This has repeatedly prompted the questions: “How do I install the solution?” and “How do I get started with the solution?”
I hope to provide those answers here and in future articles.
System and components used in this example:
My reference system:
Starting with Windows Server 2008 64bit R2. (.NET Framework feature added)
IBM InfoSphere Federation Server 9.7.5 Installed.
DB2 – test database
OPD – Optim directory database
IBM Optim Solution 8.1 FP2 installed.
Fixpack 2: Optim-08.01.00-FP02-WIN
Parts list will be the same for Optim Test Data Management, Optim Data Growth, or Optim Data Privacy:
IBM InfoSphere Optim Test Data Management Solution V8.1 Multiplatform English eAssembly (CRGV6EN)
Or
IBM InfoSphere Optim Data Growth Solution V8.1 Multiplatform English eAssembly (CRGV3EN)
Or
IBM Optim Data Privacy Solution PCI Module V2.1 Multiplatform Multilingual eAssembly (CR9J8ML)
IBM Optim Solution V8.1 Windows English (CI3NHEN)
IBM Optim Designer V2.2.3 Windows English (CI3NREN)
IBM Optim Manager V2.2.3 Windows English (CI3NSEN)
High level, this is how I install the components individually, checking for updated versions before each group:
I. IBM Optim Solution V8.1
II. Install Installation Manager - from Designer CD/Download
III. Update Installation Manager
IV. Install Optim shared libraries - from the Designer CD/Download
V. Install IDA - from Designer CD/Download
VI. Install Designer - from Designer CD/Download
This would be last, if you are using the Optim Data Privacy Stand-Alone Solution
· Optim Data Masking solution - by now the only piece needed to install is the Optim Executor
If this workstation or server will also be used as your Optim Manager, you may now install all the Optim Manager components.
· All Optim Manager Components (Manager/Server/Proxy/etc...)
Install IBM Optim Designer 2.2.3
1. Run Launchpad.exe
a. Install using Administrator Option – to allow any user of the machine to access.
2. Installation Manager 1.4.3 is installed first.
3. Restart the Installation Manager
4. Update IBM Installation Manager
a. Choose “File”, “Preferences”, “Updates”, Check the Search box, Apply, OK
b. From the Install window, choose “Update” – Install Manager Update will be found, follow through for installation.
c. You will be returned to the Install page
5. Choose Install
6. Install the IBM Optim Shared Libraries only.
7. Once complete, choose Install again. Now select the remaining packages:
a. IBM InfoSphere Blueprint Director
b. IBM InfoSphere Data Architect
i. A new package group must be created for InfoSphere Data Architect.
ii. Add – Model Exchange (Figure 1: Non-Standard Install additions)
iii. Add – Modeled Privacy Integration (Figure 1: Non-Standard Install additions)
c. IBM InfoSphere Optim Designer
d. IBM Optim Designer Online Help
8. Once install completes, choose “Update” from the Install window.
a. Check the “Update all” box
b. “Next” and accept new updates
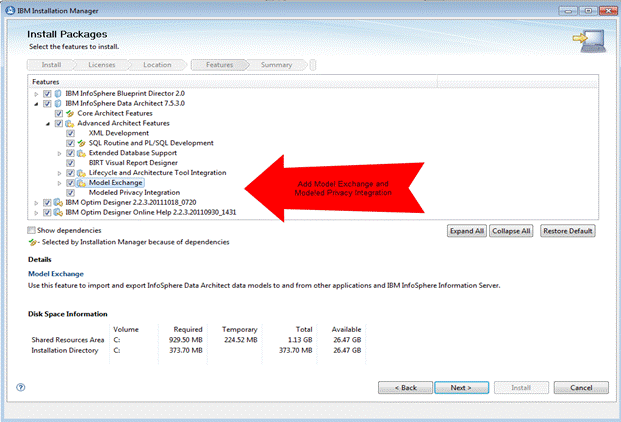
Figure 1: Non-Standard Install additions
Once installation completes, return to the Installation Manager. We need to import the InfoSphere Data Architect Activation Kit. (Figure 2: Choose Manage Licenses)
a. Choose Manage Licenses from the install menu.
b. The activation kit is located in the installation source ida_activation_kit directory.
c. Select the jar file. Accept and finish. (Figure 3: Import Activation Kit)
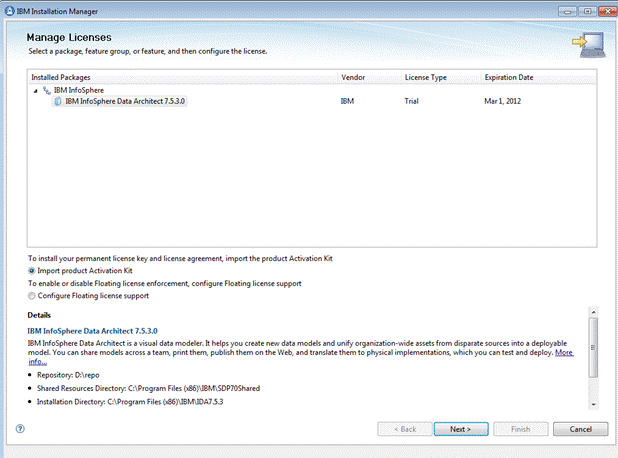
Figure 2: Choose Manage Licenses
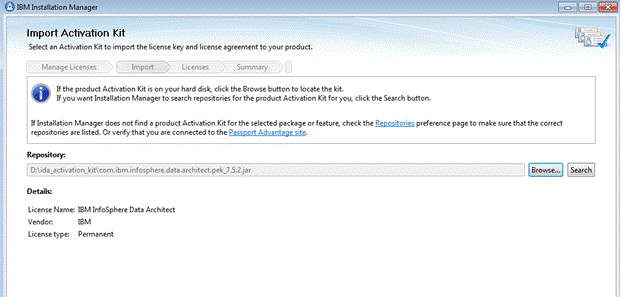
Figure 3: Import Activation Kit
Installation of the Optim Designer components is complete and you are returned to the Installation Manager. From here, you may choose Update to check for any new code since the release or quit and begin configuring Designer. I am continuing under the premise that the Optim TDM or Data Growth installation is complete and your repository and license are set up and ready for work. If this is not the case, please follow DB2Dean’s Beginners Guide to Optim Information Life Cycle Management Tools.
Using IBM Designer 2.2.3
Open Designer and choose a location for your workspace.
In my example I use C:\Optim\Workspace\Designer. You can create as many workspaces as you need. Multiple workspaces allow you to create separate configurations for different types of projects and customize the layout of designer for each one. I suggest you do not check the “Use as default” box.
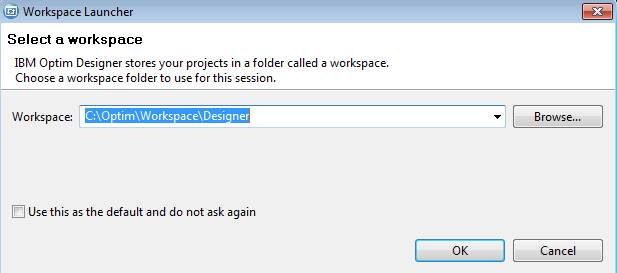
Figure 4: Open Designer
Once in Designer, the first step is to create your data sources. I will start with the data source for the Optim Repository. In my example, I have a database called OPTIM on my local DB2 server. I create a data source called OPD in Designer pointing to this database:
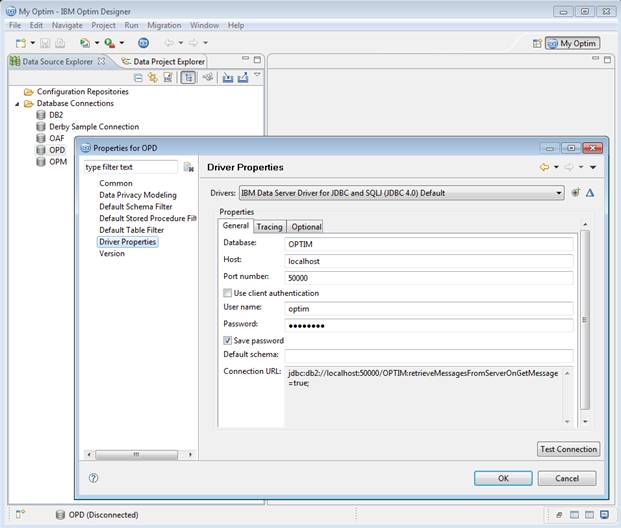
Figure 5: Create the Optim Repository data source
Now we can create the Optim Directory Project. This creates a new project in Designer allowing access to all the Optim Repository information.
Choose “File” from the top menu, “New”, “Optim Directory Project…”, choose the schema owner for the Optim configuration tables, Select “Finish”.
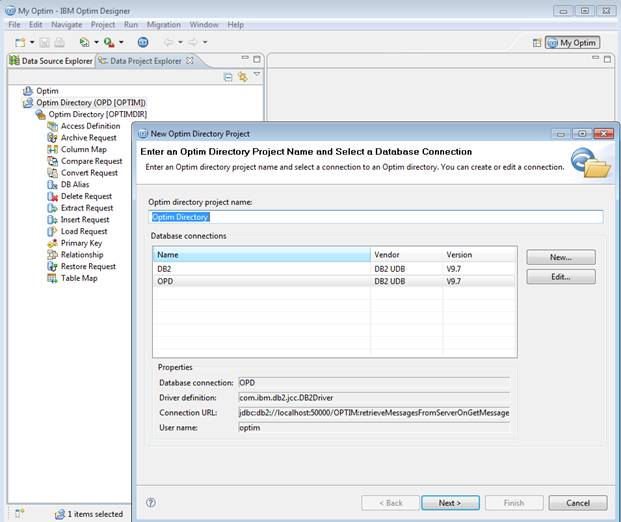
Figure 6: Create Optim Directory Project
We can now create our first data design project. This is where the real work starts. From this project we can build test data management or archiving routines. “File”, “New”, “Data Design Project”, name your project (ILM in my example), and choose a location to store your project metadata.
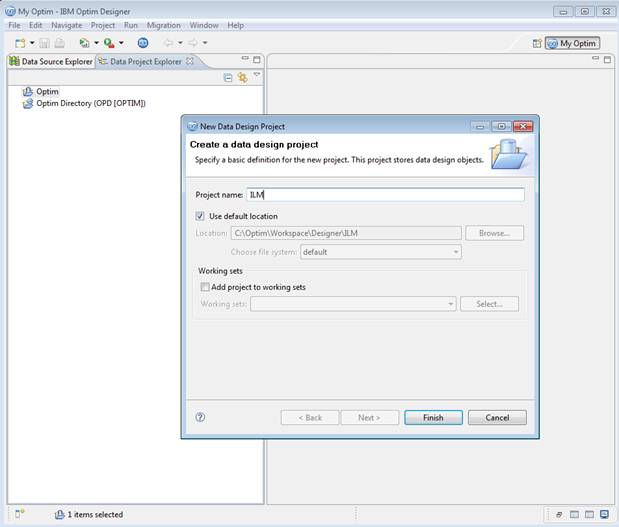
Figure 7: New Data Design Project
As you can see, the data design project can be a complete repository for our ILM needs.
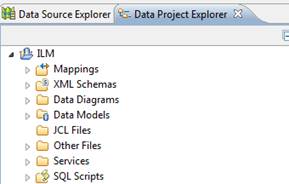
Figure 8: Data Design Repository
The first step in our ILM project is to define our source data and create a new physical data model. Create your source data connection the same way as the connection to the Optim repository, “DB2” in my example. (I have populated the “DB2” database using the sample tables loaded through Optim)
Create the physical data model:
a. Right-click on “Data Diagrams” in your ILM project, choose new physical model.
b. Check - create from reverse engineering option. Source type is database.
c. Choose the data source you just created from the list.
d. You may choose a schema to filter or bring everything in. For the example, I am choosing the schema that created the sample tables. Choose the database elements to reverse engineer.
e. Check the Generate diagram overview option. Leave implicit relationships unchecked. “Finish”
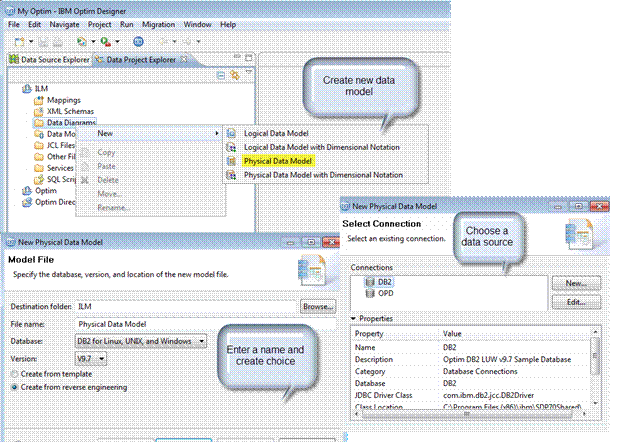
Figure 9: Create a physical model
We now have a complete data model imported from a live database. Next step, create an Optim Logical Data Model. You can convert the entire physical model or select the tables.

Figure 10: Reverse Engineering results
I will select the tables I want to work with, right-click one of the selected tables, and choose “Transform to Optim Logical Data Model”. On the next dialogs, fill in the character set for your database; give the logical model a name and finish.
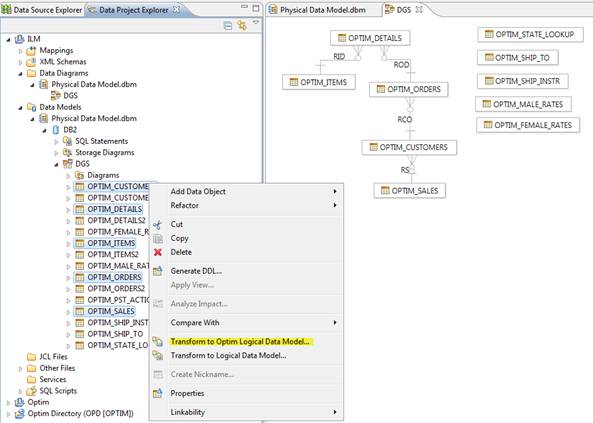
Figure 11: Transform to Optim Model
We now have a new Optim Logical Model
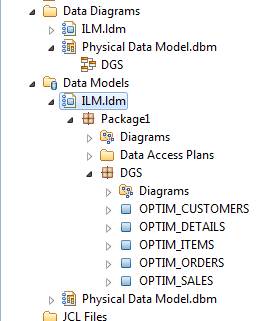
Figure 12: Optim Logical Model details
Create a new data access plan. A data access plan tells Optim where to get the data and how the data will be accessed.
Right-click the Data Access Plans folder and choose New Data Access Plan.
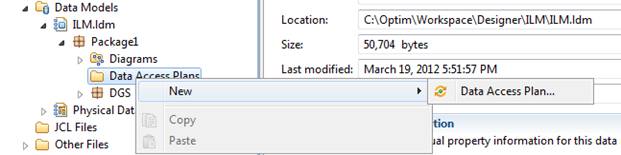
Figure 13: New Data Access Plan
Give the plan a name, “Orders” for the example. Select your package. Choose an Entity selection option. I will choose entities based on relationships with a start entity. Picking “Optim_Orders” automatically brings in related tables. Clicking Next, this selection allows you to add reference tables from your database. Finish.
Our new data access plan has been created and we are ready to enter our selection criteria. From the selection screen, we can limit the data returned by entering where clauses, add or remove relationships, and add and remove entities.
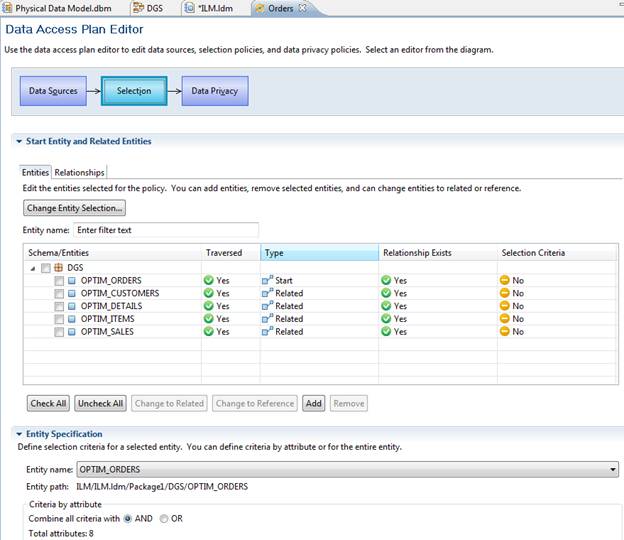
Figure 14: Data Access Plan Editor
In the Entity Specification section, I will select data based on the parent OPTIM_ORDERS table older than the 4 years. Ignore the syntax error when using the BEFORE() function as this is Optim specific.
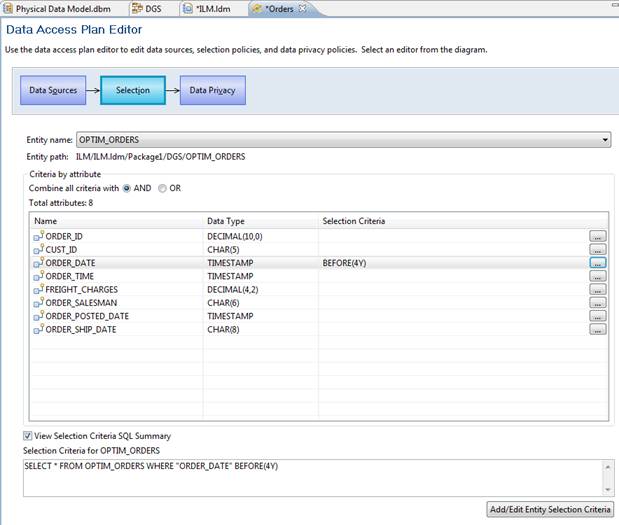
Figure 15: Selection Criteria
If this data access plan is for test data management, we would assign masking functions on the Data Privacy page.
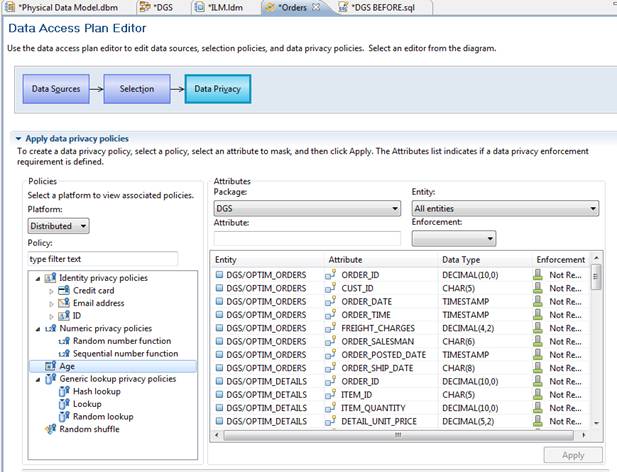
Figure 16: Data Privacy Selections
We have defined our access plan and are now ready to create a service. A service uses a data access plan to execute a unit of work. For this example, we will create a simple extract service.
1. Right-Click on the services folder in your project tree
2. Choose New, Distributed Service, Distributed Extract
3. Name your service with a descriptive name (ILM.Test Extract)
4. Choose a data source
5. Choose an Optim logical model
6. Choose a data access plan
7. Enter extract request parameters
The identifier is used by Optim to group jobs or services into logical projects. (ILM for our test extract) The name is any name you wish. (TEST_EXTRACT)
8. Enter the access definition properties. (DB2, DGS)
9. Enter Extract process parameters.
10. Select objects to extract
11. Enter group selection options
12. Finish
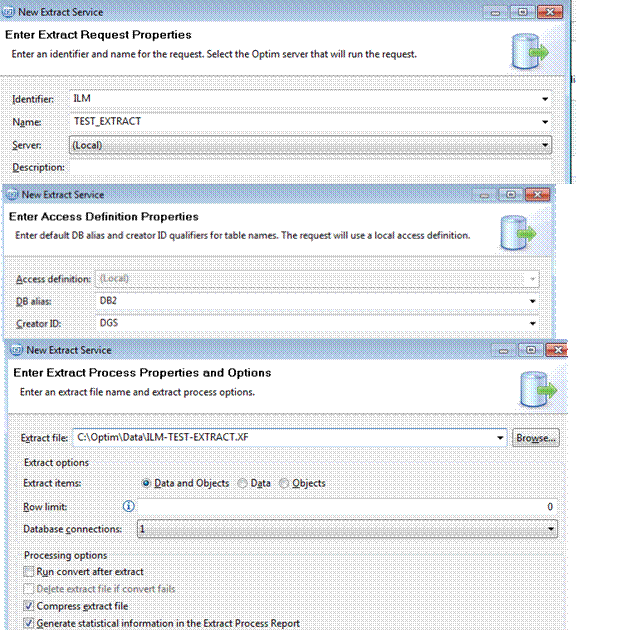
Figure 17: Building an extract service
The service is created and is ready to run.
Right-Click the service name and choose “Execute Optim Service…”. This will run the service using the internal Optim Manager. The same menu would also be used to publish the service to a Optim Manager Server. Select, “Run” in the Optim Manager.
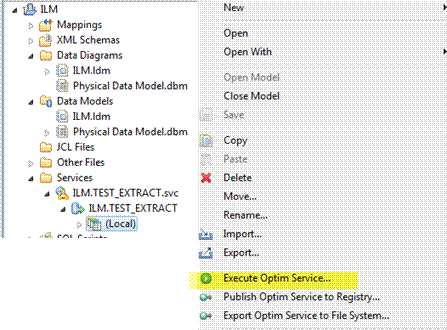
Figure 18: Execute Optim Service
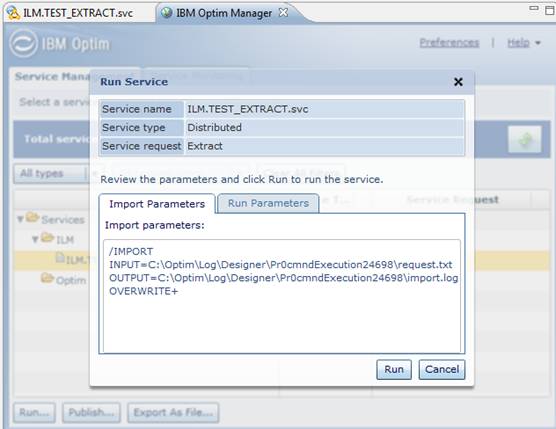
Figure 19: Internal Optim Manager
On the Service monitoring tab, we see the execution of the ILM.TEST_EXTRACT service and the complete output associated with the service run.
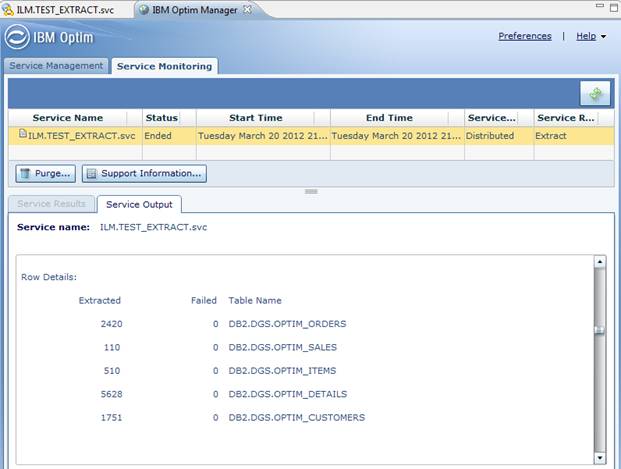
Figure 20: Service output
The output of the extract service has been stored in the designated data directory and can be viewed by double-clicking to open the browse utility.
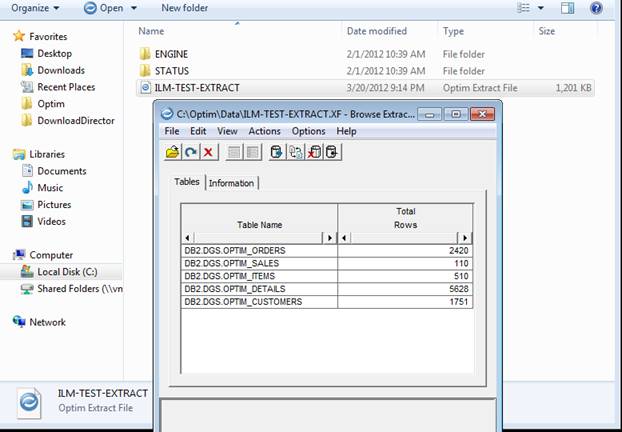
Figure 21: Browse Extract
This is a very simple example of using Optim Designer with the Optim tools. There are many more features and capabilities beyond the scope of this article. The Designer interface in used in all cycles of an Optim ILM project. The access plans created may be reused and shared for test data management, archiving, retirement, and data privacy.
For more information and tutorials
Check your Optim install paths:
<optim>\RT\DOC This directory contains all the Optim native documentation.
<programs>\IBM Optim\shared\doc Optim Designer documentation.
Optim LUW Developer Works Forum
My Optim Central - All Optim Products Information Center
Install Optim Manager 2.2.3
The Optim Manager Server can be installed in your Optim environment to allow Optim service publishing, scheduling, and execution. The server can reside on the same host as your Optim utilities or on a standalone host as needed.
Optim Manager components are installed from the Optim Manager CD/Download.
IBM Optim Manager V2.2.3 Windows English (CI3NSEN)
After running launchepad.exe, check for new versions, then select the latest components and follow through the install:
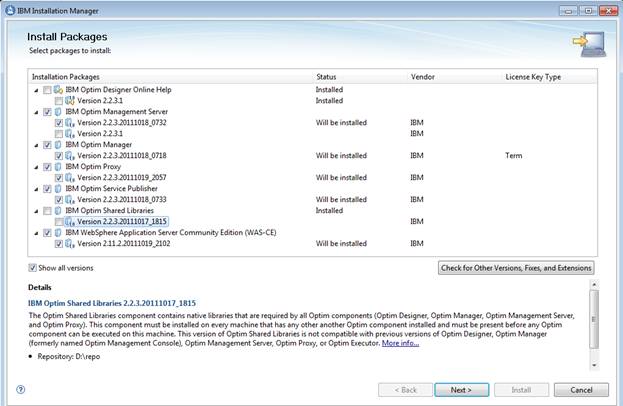
Once installation completes, you are returned to the Launchpad. Choose update, select all and apply any remaining updates.
Note: Follow the instructions in the ConfigurationManual.pdf included in the Optim Manager install to complete setup of Optim Manager, Proxy, and Publisher. Ex. (C:\Program Files (x86)\IBM Optim\shared\doc)
***
For an overview of installing the Optim Server and Workstation components, please see DB2Dean’s Optim for Information Life Cycle Management Tools article. If you have any thoughts or comments on this article please add your to the db2Dean Facebook Page or my db2Dean and Friends Community.