DBA, Get Your Own Test DB Server
By: Dean Compher a.k.a. db2Dean
22 November 2010
Do you ever just need your own database server? You're expected to do database upgrades, script maintenance procedures, be proficient at recoveries, but no one will give time on the test server when you can have the database down. Do you need “root” access, but you have nightmares about the three-month process your company requires to request it? Well, let db2Dean make your dreams come true in the cloud! In this article I'll tell you how you can get your own server with DB2 already installed for about a $1.00 an hour and all you need is a connection to the internet. I can remember times when I was a real DBA where I would have paid this out of my own pocket to have a server easily. Thank you Tom Bauch for giving the idea to write this article!
Once you have signed up for a cloud service on line you just pick a server type with the features of the servers that you want. You first decide upon the operating system you want and if you want software like DB2 already installed. There are a variety of Linux distributions and Windows Server Editions you can choose from. You can also choose to have your server created with DB2/LUW or a number of other software choices like WebSphere Application Server. You can even set up multiple servers if you need to test things like having the application on a different server than the database. You can see descriptions of all of public AMIs on the Amazon Machine Images page including the ones with DB2 Express-C and DB2 Workgroup Edition. IBM DB2 Enterprise Edition does not appear to be available on Amazon at this time.
It is easy
and cheep to get your own server in the cloud. IBM and Amazon offer
servers in the cloud and you just go to their respective web sites to
start. There are probably others too, but since the Amazon Elastic Compute
Cloud (Amazon EC2) is probably the most well known, I signed up for
it and will use it for examples that I provide here. With Amazon I was
able to enter my credit card number and started creating my first server in a
few minutes. The IBM Smart
Business Cloud is also available and will allow you to get images
with DB2 Enterprise Server Edition. The IBM cloud does not take credit
cards and can take up to two weeks before it will allow you to create your first
server. Update 2 February 2015. You can now very easily deploy DB2
and other databases in the cloud in IBM Bluemix. As of the addition of this
note, you can get a 180 day free trial. For more information please see my Bluemix Cloud Databases
article. Even though I use the Amazon Cloud for the purposes of this article,
I highly recommend that you review the offerings before choosing your cloud
platform for your business.
Use Cases
• Need to show a problem to someone external to your organization by giving them access to a server where the problem is occurring.
• You need root, but can't get it on your in-house servers.
• You need to do destructive testing.
• You need exclusive use of a database server.
• You need to stop and start your database, but don't want to interfere with your developers use of their test databases.
• You need to do some occasional or temporary testing that does not justify the purchase of a test database server.
• Want to try out paid DB2 features like Workload Manager, but don't want to take the time to purchase and provision a server.
• Many more...
Getting Started
In the next several sections I'll document the steps that I used to get my server created and to connect to it with ssh and the IBM Data Studio. The documentation was pretty good, but for the database stuff I had to do some trial and error. My intent is to provide specific examples of how to create and use a database server in the cloud in a way that would be useful to a DBA so that you will have to do less trial and error yourself.
The first step is to just go to one of the links in the paragraph above and read about what you what it costs. On the Amazon EC2 site, you then just click the “Sign Up for Amazon EC2” button, fill out some information about yourself to create an account including your credit card number. If you have ever bought a book or anything else where you created an Amazon account, you can just use that account. There is no cost to sign up, you just pay for what you use. A word to the wise – if you use your corporate card, make sure to talk to your boss first. db2Dean does not endorse doing things that will get you fired!
Creating my first Server and Connecting
A few minutes after I signed up, I got an email telling me that my account was ready and I created a DB2 database server. I went to the Amazon EC2 site and clicked the “Sign into the AWS Console” button. I really didn't know what to do so I opened the “Amazon EC2 Getting Started Guide” on the Amazon EC2 Documentation page and invoked the wizard as the guide recommended. Since I wanted a Linux Server with DB2 Workgroup already installed, when I got the the “Request Instances Wizard” page I clicked the “Community AMIs” tab, entered “db2” in the search box and chose the machine I wanted:

I then strictly followed the instructions the rest of the way. When I got to the section where you click the “Launch” button to start the server, I got some odd error, so I hit the back button until I got back to the “Request Instance Wizard” page and chose a different DB2 Workgroup on Linux option. That one worked. I then continued to follow the instructions as written in the getting started guide. Since I was making my connection from Windows XP to Linux, I downloaded Putty commands listed in the getting started guide and then continued with the directions to convert the .pem key to a .ppk key and was able to connect using the Putty ssh feature.
When I connected I proceeded to perform the following steps:
• Since I used a different AMI (Linux image) than the default, I tried to use root as my initial login and it worked. On this initial login I was then prompted to provide the password I wanted to use for root and I did that.
• I was then shown a screen to give passwords for db2inst1, the fenced user and the DAS user. I kept the default user names and entered the passwords for these user ids. This is a UNIX style character based screen so I had to reach way back in my memory as to when to use the tab, space and enter commands to navigate.
• After this I was prompted to enter my security keys. Nothing I did seemed to work, so I finally chose the “abort option”. It gave me an error that it was not going to create a certain type of database storage and then dropped me into the regular Linux root “#” prompt.
• I then did an “su – db2inst1” command, got in and tried out several commands like db2level to see if DB2 was working. It worked great!
It took some time to get everything configured because I'm not real familiar with Linux, network and security administration so I had to stop think and start over a few times. It probably took me about 2 hours to get a working server, but I could probably do one in about 10 minutes now that I've got the hang of it and understand these written instructions.
Creating some Databases
Now that I was up and running with a good DB2 instance I needed some databases for experimentation. I decided to use the GSDB database download that is used in examples in developerWorks for all of the Optim Integrated Data Management Tools like Optim Development Studio. First I downloaded the GSDB database from the GSDB Database Download site to my laptop. The file you download is a zip file with a script the creates the database and all objects and loads a significant amount of data into the tables. The getting started guide didn't tell me how to upload files so I experimented a bit. The ftp command that comes on Windows didn't seem to work, but I remembered seeing some additional commands on the Putty site listed in the Amazon EC2 Getting Started Guide so I downloaded them and tried them out. I got the pscp command that does scp file transfers to work. The documentation for it is also on the Putty site. The syntax I used to do the upload was:
C:\x>pscp -i db2Dean.ppk GSDB_DB2_LUW_ZOS_v2r3.zip root@ec2-50-16-67-155.compute-1.amazonaws.com:/home/db2inst1
where:
|
dbDean.ppk |
key I converted for my Putty ssh connection as described above |
|
GSDB_DB2_LUW_ZOS_v2r3.zip |
the file I downloaded containing the GSDB database |
|
ec2-50-16-67-155.compute-1.amazonaws.com |
the host name assigned to me when I created my server |
|
/home/db2inst1 |
target directory where I wanted to place the file on the server |
|
root |
user id for the connection. I tried using db2inst1 as the user but that didn't work, so I tried root and that worked. |
|
|
|
|
|
|
I then connected to my server using a Putty ssh window and unzipped the GSDB file using the unzip command. I then ran the script that creates the GSDB database and loads the data into it. I then connected to the GSDB database and started querying the database just as easy as you please. I just used the Linux command line CLP like:
$ db2 connect to GSDB
$ db2 list tables for schema GOSALES
$ db2 “select count(*) from gosales.product”
Since I was on a roll, I decided to create the sample database too. I just executed the “db2sampl” command that gets installed whenever a DB2 instance is created. I then did a “db2 list database directory” and I could see my both the GSDB and SAMPLE databases are there. If I had a database backup handy without sensitive data, I could just have uploaded my backup and logs, restored it, and finally rolled forward.
Think about this: I've now got my own Linux server to use and do anything I want just like I would with any Linux server with DB2 in my own company, except that I didn't have to install DB2 and I didn't have to grovel in front of the SA's to get root!
Client Connection from my Workstation
I don't have an xWindows emulator on my workstation, but I wanted to do some GUI administration, so I decided to connect my copy of Data Studio to my new database. First I needed to know the port on which this DB2 instance was listening, so I executed the following command an got the output shown:
$ db2 get dbm cfg | grep -i service
TCP/IP Service name (SVCENAME) = 50001
Remember if the SVCNAME is an actual name, you can then look the name up t in the /etc/services file to find the port number.
I remembered setting up the port for SSH in a security group as part of the launch of my server, so I knew that I would need to open the port for DB2 so that I could connect my laptop to it as a DB2 client. Again see the “Amazon EC2 Getting Started Guide” for this part. I added ports 50000 to 61000 just in case I wanted to add any other instances. I did this by clicking the “Security Groups” link on the left side of the Amazon EC panel (the same place your instance panel is shown). In this example I'm showing how I added the port to the “db2DeanCloud” security group that I created as part of the server launch. You will notice that it is already there, but I wanted to show how I added it because I forgot to do a screen capture the first time.

On my own Windows XP laptop, I then created my a connection in IBM Data Studio as shown in the next example. If you want to use control center instead, you can just catalog the node and database.

I was then able look at information about tables and other objects in Data Studio:

Now that I've got databases created and I can connect to them do all sorts of things like creating several connections to the database and forcing them, doing off line backups and restores, and running scripts to do anything I want that I would not be able to do if developers were testing on the server. I can even upload a new fix pack and install it to see what is involved and possibly script a response file install process.
It took me about 5 hours to do this and it cost $6.25 US. This price included the cost of the file upload that I did. Mileage may vary, so make sure to read the fine print about how much this will cost. You should note that I was just figuring things out and writing this article as I did it. Now that I somewhat know what I'm doing, I would be able to create another server in only a few minutes.
Get your Own Data into the Cloud
As I stated earlier I created the default sample database and uploaded the GSDB sample database to my server to have two databases to use. These are great for testing utilities like backup and recovery or for testing the application of a fix pack. However, you may need real data if you want to do application testing. If you need to test with your own data then you really need to consider what you are doing. There are definitely security concerns with putting your internal data in the Cloud and if you do, you would want to make sure you really know what you are doing as far as administering security...
...Unless...
... You purchase the IBM OPTIM Test Data Management (TDM) tool with the Data Privacy Option. These tools make it easy for you to create subsets or complete copies of your production databases and privatize the sensitive columns like credit card numbers, names, phone numbers etc., that are all semantically correct. For example, if you privatize a credit card number that started as a Visa number then the copy in test would also be a Visa number, but be different than the original. You would also want the name Carl Malone changed to something like “John Stocketon”, not something like “uUk;y8 RriluYu”. The Data Privacy option has dozens of functions to privatize the data the way you want it and if you need something special then you can write your own functions and plug them in. Further the Test Data Management tool allows you to pick a subset so that you don't have to pay for a ton of storage in the cloud. You can pick a percent like 10% of your data or an interesting portion like all orders placed in the last 3 months, with all related data and all reference data. With TDM and DP you could conceivable get rid of your test servers and just do your testing in the cloud.
A Note about Licensing
You can use these DB2 pre-installed images for evaluating DB2 and testing db2 functions, but when it comes to doing application testing, the license on the image may not be sufficient. Also you need to test installing DB2 and/or scripting installs, you can start with a clean Linux or Windows server, upload your software and install it as long as your organization owns enough DB2 licenses to do so. For these and other licensing questions, please consult your friendly IBM salesperson.
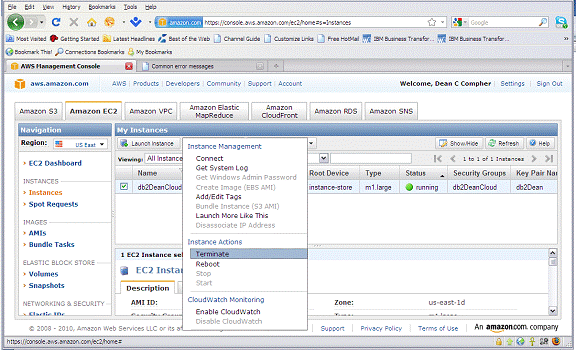
DO NOT GET CHARGED EXCESSIVELY!
When you are done don't just leave the browser. Your server will keep running and charges will continue to accrue unless you terminate your session. However, when you terminate your server is DELETED and you can't get it back. There is a way to store your stuff, but I'm sure that costs money. You will have to read more about that on the Amazon EC2 site. To ensure that you don't continue incur server time charges after you are done, make sure that you read the instructions for terminating thoroughly. Here is how I ended my session:
***
I hope that you found this useful. As you discover other tricks for doing things in the cloud, please add your discoveries to the Message Board section on my db2Dean and Friends community page.