BLU for Cloud
Dean Compher
23 December 2013
BLU for Cloud has been migrated to dashDB. It is still available as a free trial as of 2 February 2015. Please see my Bluemix Cloud Databases for more information on dashDB and other cloud databases.
IBM is providing a DB2 Advanced Enterprise Server Edition instance in the cloud for you to try new features of DB2 10.5 at no charge through about mid-February 2014. We really want you to try out BLU Acceleration, but you can experiment with any feature that you like including the JSON feature, Adaptive Compression, Multi-Temperature Storage and others that do not require DB or DBM configuration changes or server clustering like HADR. It is easy to create an account on this server. Once you have one you get a schema in one of the databases on the site where you can create tables, indexes and other objects and then load your data and experiment. You can also use sample schemas with pre-loaded data. You can use the tools on the web site to create your tables or you can connect through your favorite tools like Data Studio or the DB2 CLP to create them and then load your data. This site also has instances of Cognos, “R” Statistical Tools, and Excel that you can try out to see how they work on data already in the database on this site. Of course, if you have these tools or others on your own machines, you can connect them to this BLU for Cloud database and try them on your own data that you load. Keep reading to see how to do this.
The first step is to go to the http://bluforcloud.com/ website and request an account.
Click the ![]() button in the middle of the
bluforcloud.com home page to begin the process.
button in the middle of the
bluforcloud.com home page to begin the process.
Figure 1. bluForCloud.com home page.

You will then need to complete a page with these few fields:
- Your e-mail,
- Name
- Company or Organization name
This submits an application for our cloud services. This will cause an e-mail to be sent to you with a link to complete your application.
I joined and in less than a minute I got an email from “IBM IM Demo Cloud <support@imdemocloud.com>” entitled, “You are invited to the IBM IM Demo Cloud”. This message contained a link to complete the application. You should see the same thing. When you click the link the first page contains the terms for the use of the VM. To continue you need to click the accept button and continue with the next button. You will then be prompted to create a password for your connection to the DB2 instance and databases and then you will be prompted to take the virtual tour. I highly recommend this since it is quick and shows you how to use the web site including how to use the live chat that is available to get help.
Once you go through the acceptance screens you will land on the screen shown in Figure 2. Click the IBM BLU Acceleration for Cloud – Technology Preview link to proceed. When I did this it then asked me to accept the agreement again. I accepted and pressed “Submit”.
Figure 2. Dashboard.

You will then be prompted to accept the terms for the “R” project for Statistical Computing. R is statistical software that is frequently used in analytics processing. You will need to accept the terms to move forward.
You will then see the screen shown in Figure 3. To learn more about BLU for acceleration click the video course link by number 1. This will send you to the IBM Big Data University site where the video course is located. If you are not already a member of the Big Data University then you will need to need to enroll.
To actually start using your database, click on the System tab that is circled in red in figure 3. It will throw you in to a quick virtual tour. The tour shows you how to use the web page, tells you if the system is on or off, how to interact with other users in the forum, how to get help using live chat and how to open tickets using the Support tab.
Figure 3. Use the Database

Once you click the System tab and the tour is over you will get a page that looks like figure 4. Click the link “http:// bluforcloud.imdemocloud.com:8443” to proceed.
Figure 4. System Status Page

Clicking the link in figure 4 will bring you to the BLU for Cloud main page shown in figure 5.
Figure 5. BLU for Cloud Main Page

The large buttons on the page above let you try out various aspects of BLU The top 3 allow provide working examples of using Cognos, R and Excel to query database and generate results from data already in the sample database. The “Explore with Excel” button even lets you upload Excel data and have DB2 automatically create a table and load the data without you having to write any DDL or SQL. There is some pretty interesting stuff that you can do in these functions and I encourage you to give them a whirl.
The bottom two buttons are more interesting to many members of the db2Dean audience since many may prefer to use their own DB2 clients as I describe below. The “Design your database” button allows you to paste your DDL into a box and run it to create your tables, indexes and other objects. It also allows you co connect InfoSphere Data Architect and create the objects that way. Since this database is configured for BLU, your tables will be column organized by default unless you specify the ORGANIZE BY ROW parameter when creating the table. The “Load data” button allows you to upload your files to the server and load that data into the tables you have created. You can also load it from an Amazon S3 account if you have one. If you look at the set of tabs at the top of the page, you will notice that one is “Run SQL”. This will display a page where you can paste your own SQL into a box and run it.
Getting Connected
I suspect that many people will just want to connect to this database and create objects and LOAD FROM CLIENT/INGEST/IMPORT their data as a client of this database. To do so, click the “Connect Your Applications” tab in the window shown in figure 5. This will show you the connection information for the two databases in this instance as you can see in figure 6.
|
BLUDB |
Database where create tables under your schema. Your schema is your userid for this system. |
|
SAMPLEDB |
Contains pre-loaded data for the Cognos and other sample applications on this site. |
Figure 6. Database Connection Strings

For your convenience, I have created the catalog commands for these databases and also show the Data Studio Connection properties for them. Since everyone is sharing the same databases, you can use the exact catalog and connection strings that I show in figure 7. Don’t forget that the machine you use to connect to these databases must be able to connect to the internet.
Figure 7. Catalog Commands and Data Studio Connection properties
CATALOG TCPIP NODE blucloud REMOTE bluforcloud.imdemocloud.com SERVER 50001;
CATALOG DB bludb AT NODE blucloud AUTHENTICATION SERVER;
CATALOG DB sampledb AT NODE blucloud AUTHENTICATION SERVER;


What Next?
Once you are signed up and connected what can you do? Pretty much anything that could do with a client connected to one of your local database servers. You can create tables and other objects in your own schema and load data into them. You can run applications that SELECT, UPDATE, and run utilities like RUNSTATS. Your schema will be the first part of the e-mail address you gave when you joined BLU for Cloud. For example my address is dcomphe@us.ibm.com so this system assigned me the DCOMPHE schema. That schema name is also my user id when connecting to the database. The password is the one you created when joining.
To show some possibilities of what you can do to get started, I show some examples of using Data Studio and the DB2 CLP on my workstation connected to these databases. To get some tables, I brought up Data Studio an exported the DDL for objects from one of the schemas on my local machine by right clicking the schema name and choosing Generate DDL as shown figure 8. I unchecked the box to generate fully qualified names because I need to use my own schema name when creating the objects. I also got rid of syntax like “Compress NO” and “CREATE INDEX” that can not be used on column organized tables.
Figure 8. Generate DDL in Data Studio

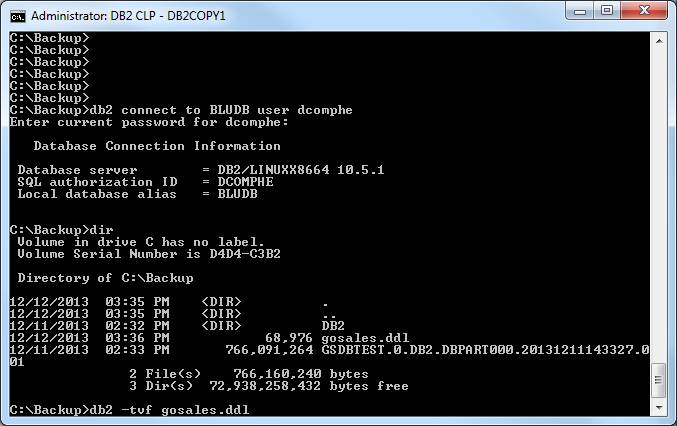
In the Data Studio example above, I exported this DDL to a file in the C:\Backup directory called gosales.ddl. To illustrate how to use the CLP, I connected to the BLUDB database I cataloged using the commands in figure 7 and then and ran the DDL file as shown in figure 9. As you can see I used the dcomphe user id to connect.
Figure 9. CLP Connection to BLUDB
I had to try running the script a few times to get the syntax just right, but I eventually got it to run. You can see some of the tables that I created in my schema in the Data Studio example in Figure 10.
Figure 10. DCOMPHE tables created from ddl file.

Once you are connected using Data Studio, the CLP or your favorite client you can load, insert or import any data that you wish. I will not bore you with any other connection examples in this article, but you can connect the same way and just execute your favorite client commands or upload your own file to the site and load it from there. Remember there is only a limited amount of time that this site will remain active and free, so please try it soon. If you find something interesting when trying this site, please let us all know on my Facebook Page or my db2Dean and Friends Community and help the extended community.