Scheduling Python Scripts
to Run in Cloud Pak for Data
Dean Compher
29 July 2021
From time to time, you may have a reason to automatically run a Python script in your Cloud Pak for Data System. A number of tools in Cloud Pak for Data (CPD) allow you to create jobs that are run on a regular basis, but you may want to run some tasks that are better suited to a Python script. In this article I will describe how schedule your Python script and run it on a schedule. Thank you, Garrett Young and Ryan Kather, for providing me with much of the information in this article.
There two ways to accomplish this. One is to write your script in a Jupyter Notebook in CPD and the other is to import a Python Script. Using either method you will run the notebook or script by creating a Job in your project once you have added the script or notebook to your project. Using a Jupyter Notebook is an easier process. You need to have Watson Studio deployed in your CPD environment to allow either of these.
Notebook Method
Start by creating a Jupyter Notebook in CPD and then writing your Python code in it, making sure to save a version of the notebook. Do this by clicking the File in the main menu at the top and choosing Save Version from the dropdown menu presented. If you don’t do the save version, you will not be able to schedule the notebook to run automatically.
Next, exit out of the notebook and go back to your project containing the notebook. If you hover the Notebook, the ellipse menu will appear on the right. Click it and choose Create job from the dropdown menu. Next follow the prompts to schedule either a one-time or repeating run. See the Scheduling a notebook page for details on how to do this.
Script Method
If you prefer to run a Python script that is not in a notebook, you can do that too, but the process of getting your script into your project is more involved. You can’t just add your script to a CPD project. You must use a project in CPD integrated with Github and use the Jupyter Lab IDE within that project to add the script to Github and finally pull it into the Scripts section of your CPD project. Here are the steps to do this:
Create Github Repo
If you create a new repository for this purpose here are some tips to create one that works well with CPD:
- Log into Github and click Repositories and then click New
- Give the repo a name and choose public or private.
- Do Not check any of the Initialize this repository boxes
- Click Create repository Button
- Capture URL shown on the next screen. You will need it later. In my case it looked like this:
o https://github.com/db2Dean/CPDPythonScript.git
- Don’t Import Code or any other actions on this page
Github Token
Create a Github personal token if you don’t already have one.
- A token gives access to your whole Github account. You do not need a different one for each repository.
- Click on your profile dropdown
- Click Settings
- Click Developer Settings
- Click Personal access tokens
- Save this token somewhere. You will not be able to view it again within Github.
Create CPD Project
Go back to your CPD console and create a project that is configured as follows:
1. Click the Integrate with Git check box. This will open some additional fields on the panel.
2. If this is the first time you are using a Github token, then click the “New Token +” link on the right side of the screen and add the token you created above. If you already have entered a token in your CPD system, then skip this step.
3. Select the token from the dropdown.
4. Enter the Github repository URL you captured when creating the repository.
5. Select the Github Branch from the dropdown.
6. Click the “Edit notebooks and Python scripts with the JupyterLab IDE” box
7. Finally click the “Create” button in the lower right of the panel
8. Go back to the CPD project you created
9. At the top there is a git menu that looks like a circle of arrows. Click it and select “Push and Pull”. It looks like this:
Create the Script
10. From the CPD Projects panel open the Project you created in edit mode.
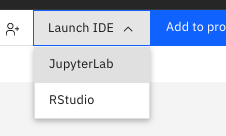
11. In the project, from the menu on top, choose Launch IDE | JupyterLab
12. If you don’t see the Launch IDE menu, they you probably didn’t create the project correctly.
13. Click the folder icon at the top of the menu on the left:
14. Navigate to this directory. This stricture is in your Github repository:
o Project_git_repo/<your_git_project_name>/assts/jupyterlab
15. Right click in the file browser and click New File.
16. A new file called untitled.txt will be created.
17. Right Click on that file and choose Rename.
18. Rename the file to something with a .py suffix. For example, myscript.py
19. Double click the file name to open the editor. Type or paste your script into the right pane.
20. Save the file as a Python (.py) file
21. From the menu on the left click the upside down “y” icon (two down from the folder icon) as shown here:
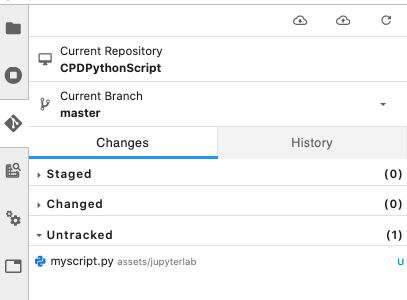
22. Expand the “Untracked” folder and you will see your script there.
23. Next click the + to the right of the .py script that shows up when you hover over the script name.
24. That will move the file to the “Staged” section.
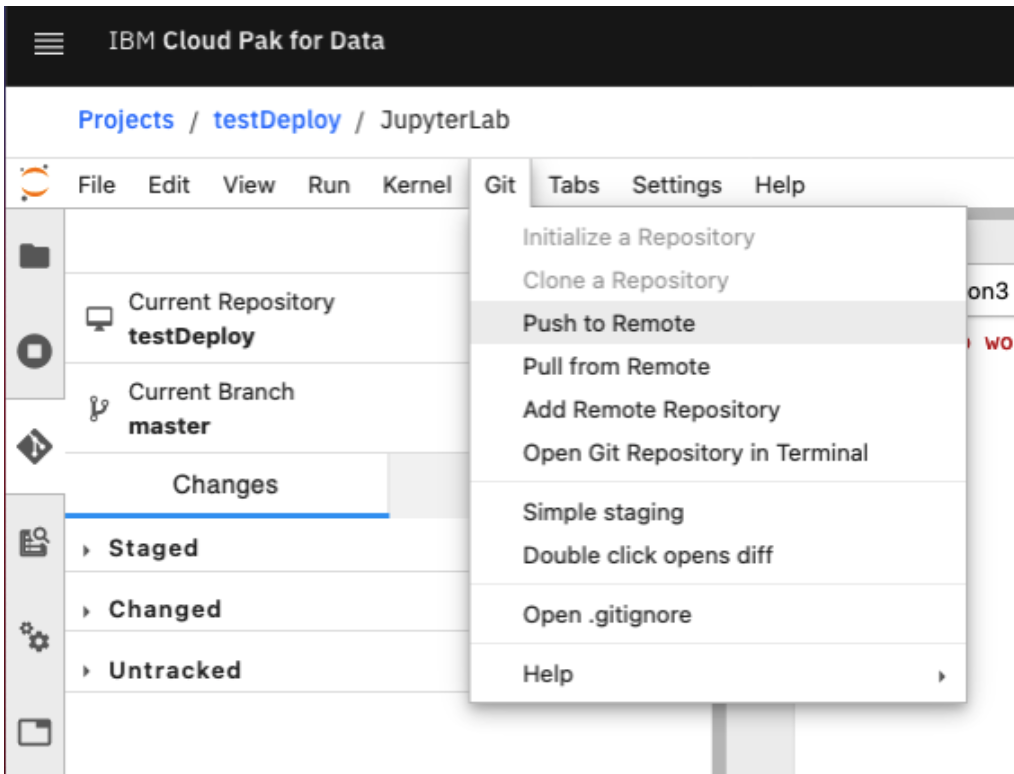
25. Next enter any text in the Summary box at the bottom and click Commit. The text you enter will show up as a description of the file in Github.
26. Next click Git | Push to Remote from the menu at the top:
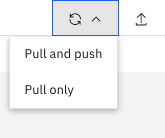
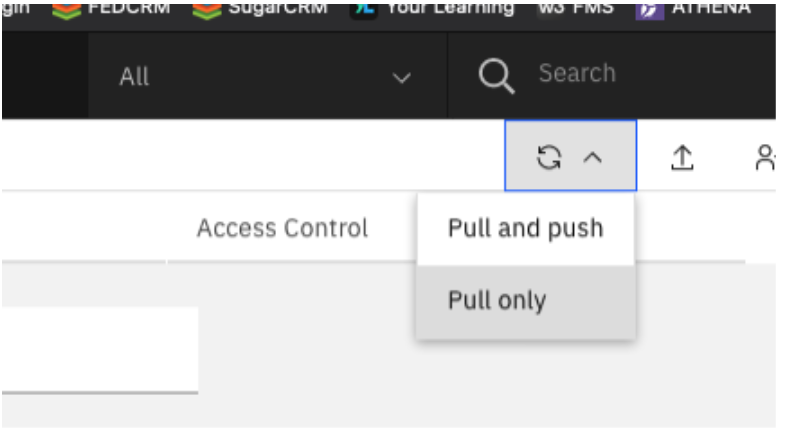
27. Now go back into the CPD project screen and choose the Assets tab. In the project page click the Sync symbol and choose “Pull Only”:
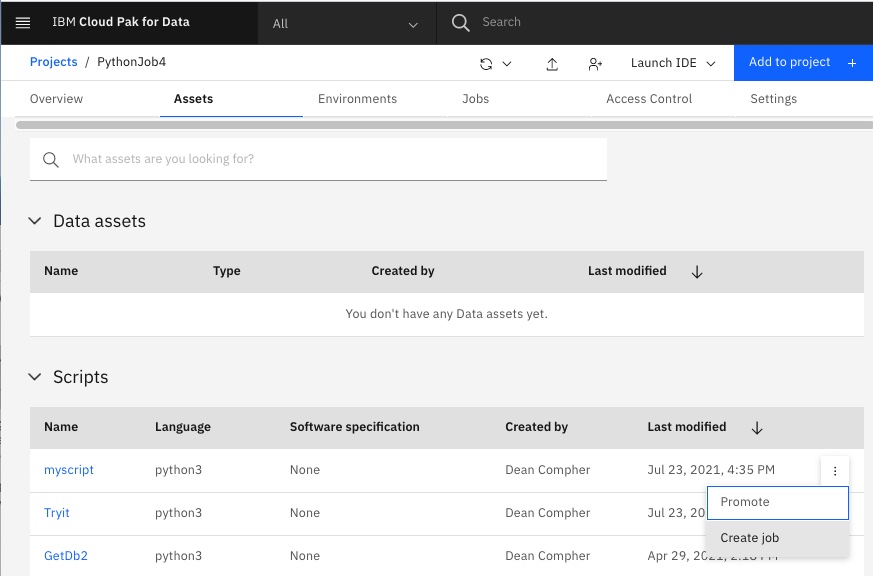
28. This will make the Scripts section show up in the project with your script in it. The above process makes the script show up in your Github repository too.
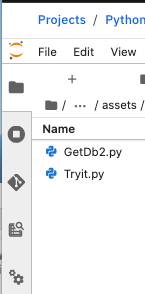
29. You should now have a Scripts section on the project “Assets” page with your script in that section:
Schedule your Script
You can now run the script, schedule it to run once at a later time or schedule it to run at some interval. You do that by clicking the ellipse menu to the right of the script and choosing “Create Job”. See the “Creating jobs from the Assets” section of the Jobs documents page for information on creating jobs. Or you can just proceed through the Create job dialog. It is quite easy to use.
***
In this article I wanted to show you how to have Cloud Pak for Data schedule your Python scripts to run automatically. You may have some good use cases for doing this, so please post those ideas to the db2Dean Facebook Page.