Data Studio XLM Editor
Using DB2 Automatic Maintenance Examples
Dean Compher
28 February 2014
In this article I will show you a great tool to edit XML files and validate their syntax and there is no charge for it. For my examples I will use the DB2 Automatic Maintenance XML files and associated schema that come as samples with the database. You define your automatic maintenance policies using these XML files in DB2. The process I show here also works for any XML file that you want to build or get from other sources. Fortunately, DB2 provides sample XML files that include all possible configuration parameters and I’ll show you how to start with them so that you do not have to write the whole thing yourself. We will import the XML files and their corresponding schema (XSD) files into Data Studio for easy organization and use the XML feature of Data Studio to edit and validate our XML. Not only does the validation feature check syntax, like verifying that the XML document is well formed, but I’ll show you how to validate that you picked valid parameter values. For example, the only two types of DB backups are OFFLINE and ONLINE. If you type an option that does not exist like “ONOFF” then the validation will tell you that you have that sort of error too.
There are a number of steps that you need to perform to import the XML documents and related schemas into Data Studio before you can edit and validate it. Here are the steps that I will show in this article.
- Create Project
- Import XML and XSD (Schema) Files into Project
- Link XML and XSD Files
- Edit XML File
- Validate XML Changes
Create Project
The first thing that we will do is to create a project folder to hold our XML and XSD files. XSD files are XML schemas that are used to define what is allowed and what is not in an XML file. Fortunately, DB2 provides XSD files for the Automatic Maintenance XML files as well as other sample XML files. The “Data Development” project is a good choice because it can keep your XML and XSD files nicely organized.
To configure automatic maintenance I like to start in the “Database Administration” perspective. This perspective is great for any other XML you want to edit as well. Others will work, but since our example files are administering a database, I’ll use this one. If you are unfamiliar with perspectives in Data Studio, I recommend that you read my article called Data Studio Update Part 2: Perspectives, Views and Database Connections. To Begin the process of editing your XML, go to the Data Project Explorer view and right click anywhere in that view and then choose New | Project as I show in figure 1.
Figure 1. Create a new Project

From there you will get the New Project box. Under the word “Wizards:” type Data Development and then choose Data Development Project under the data folder that appears as shown in figure 2. Then click next and the New Data Development Project box is shown. Name your project here and click next. In figure 2 I name my project “AutoMaint”. Then choose the database connection you wish to first associate with this project. For our purposes it does not matter which one you choose. Then click Next/Finish until your project is created. At the end I recommend that you remain in the Data Administration perspective.
Figure 2. Data Design Project

![]()

Import XML and XSD Files into Project
We will now import the XML and XSD files into the project we just created. This will make a copy of the files in your Data Studio Workspace, so if you break them, you can just import them again from the original source. I have a DB2 database on my workstation so I have the XML and XSD samples there. If you don’t then you will want to copy the sample files from a DB2 database server into directories on your workstation where Data Studio lives. Since I am running DB2 on Windows 7 my sample files are in the following directories:
|
XML |
C:\Program Files\IBM\SQLLIB\samples\automaintcfg |
|
XSD |
C:\Program Files\IBM\SQLLIB\MISC |
On other Windows systems the SQLLIB directory may be in a different place, but the subdirectories under it should be the same. On Linux and UNIX systems you should be able to find these sample files under:
|
XML |
<instance_home>/sqllib/samples/automaintcfg |
|
XSD |
<instance_home>/sqllib/samples/MISC |
Next import the XML documents into your project. Start by expanding the project you created (AutoMaint) and then expand the XML Folder. Then right click on the XML Documents folder and click “Import” and that will bring up the Import Dialog Box as shown in figure 3. For the import source type “File System” and then choose the file system folder to tell Data Studio that you will import the files from a directory. Then Click Next.
Figure 3. Begin XML Import

![]()

After choosing that you wish to import from the file system you will be presented with the File System Import Box shown in figure 4. In this dialog box, you will start by entering the “From directory”. This is the directory where your XML files exist. You can type the directory or use the Browse button. You will then be shown the XML files in the directory. Check the boxes next to the ones that you wish to import. You then need to enter the project name in the “Into folder” by either typing the name or using the Browse button. Finally, you click the Finish button.
Figure 4. Complete XML Import

Figure 5. AutoMaint Project w/ XML and XSD Imported
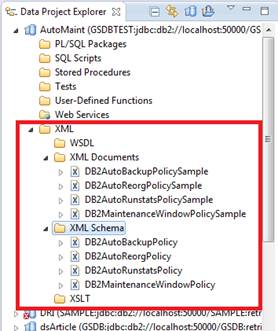
After importing the XML files, you can import the XSD files that will be used by Data Studio to validate the XML. To do this, right click the XML Schema folder and then follow the same steps as you did for XML in figures 3 and 4 above except that you will navigate to the directory of XSD files and check those files. When you are done, your project will look something like figure 5 depending on the files you selected.
Link XML and XSD Files
Now comes the tricky part. I was not able to figure this out myself, so thank you Chris Khoun in the Data Studio group for telling me how to do it. You need to associate each XML file with its corresponding XSD file that describes it and provides syntax checking. This process will actually change the XML file, adding pointers to the XSD file so that when you validate the XML file it knows the schema that defines the valid values in it.
As shown in figure 6 you start by double clicking the XML file with which you want to work. That brings up the “XML Navigator” view shown on the right. Make sure the Design tab is selected and then right click the “?=? xml” line. Then click the Edit Namespace option from the pop up.
Figure 6. Associate XML file with its XSD file

You will then get the Edit Schema Information dialog box where you will continue the process. Choose the only line in the Edit Schema Information box (Namespace Name http://www.ibm.com/xmlns/prod...) and click Edit. This will start the New Namespace Information box where you will click the Browse button.
Figure 7. Edit Schema Information and New Namespace Information

![]()

This will bring up the Select File dialog box where you will choose the “Select file from Workspace” option and the select the XSD file that corresponds to the XML file that you chose earlier. Then click OK and then click OK from the New Namespace Information box. You will then be back at the Edit Schema Information box with the value you chose in the Location Hint column as shown on the right side of figure 8. Now click the Add button.
Figure 8. Select XSD File

![]()

You will now be presented with the Add Name Space Declarations dialog. Make sure that the “Select From Registered Namespaces” option is selected and then click both the xsi and xsd boxes as shown in figure 9. Then click OK.
Figure 9. Last XSD Association Step

You will now be back at the Edit Schema Information box which looks like Figure 10. Finally click OK to complete the XML/XSD association.
Figure 10. Completed Namespace Example

Edit XML File
Once you have done all of the steps above you should be in the XML Navigator window as shown in figure 11. In this figure I am using the sample automatic backup XML file that ships with DB2 10.1 and have expanded all sections in the Design tab. You can use this editor to edit any XML file that you like whether you have associated it with an XSD file or not. If you are reading this article for information about configuring DB2 automatic maintenance, then I would suggest that you generate your XML file as described in my Configuring DB2 Automatic Maintenance using Data Studio article, putting the XML generated in its own file and finally importing it into Data Studio as described above. It is good to have imported the sample as well, because the sample documents contain comments describing each field in the XML file.
Many XML files you get including the sample XML files that come with DB2 are just a long string of characters all on one line. You will see this if you open any of the DB2 XML samples with Notepad, vi or most other editors. However, Data Studio provides a nice, free editor that formats the XML for easy editing. An XSD file is not required. As you can see in Figure 11, you can view the XML in Design view (left side) or the Source view (right side) depending on the tab you click at the bottom. Don’t forget you can double click the tab (file name at the top – in this figure “*DB2AutoBackupPolicySample.xml) to make the view consume the full window and double click it again to reduce it again.
Figure 11. XML Navigator Design tab and Source tab.


In the Design tab, you can easily change any attribute
value. They are designated with the “![]() ” symbol and in this example you can
change the backup (mode), the maximum amount of time between backups
(timeSinceLastBackup) and other parameters. These are all very well
defined in the comments that you can read when you open the source tab.
These comments also tell you how a backup will be done if any of the criteria
are met. To change a value in the Design view you can just type over
it. For example, if I wanted to change the minimum number of changed
pages that should be logged before I backup the database from 6400 to 7000,
then I would merely clear the value of 6400 in Figure 11 and type “7000” in its
place. You could also make that change to the source tab, but you need to
be more careful because you can also change anything else around it.
” symbol and in this example you can
change the backup (mode), the maximum amount of time between backups
(timeSinceLastBackup) and other parameters. These are all very well
defined in the comments that you can read when you open the source tab.
These comments also tell you how a backup will be done if any of the criteria
are met. To change a value in the Design view you can just type over
it. For example, if I wanted to change the minimum number of changed
pages that should be logged before I backup the database from 6400 to 7000,
then I would merely clear the value of 6400 in Figure 11 and type “7000” in its
place. You could also make that change to the source tab, but you need to
be more careful because you can also change anything else around it.
In an XML file an element often describes some type of
metadata. You can sort of think of an element like a table or schema name
in a database, except elements can also be data. The value of an
attribute (![]() ) on the other hand is like a piece of
data in a column of a particular row in a database. As I said in the
previous paragraph you can easily change any attribute value just by typing
over it. You can also change the lowest level element “
) on the other hand is like a piece of
data in a column of a particular row in a database. As I said in the
previous paragraph you can easily change any attribute value just by typing
over it. You can also change the lowest level element “![]() ” values by typing a
value into them too. For example, in the Design view above, you can
change the “PathName” where your backup files land by adding a physical path
name to the right of the element. However, you change higher levels in an
element hierarchy by right clicking on them. If the element allows you to
change it, you will see the “Replace With” option as shown in figure 12.
You would then choose the element that you like in the next submenu. In
this case you get a choice of all of the possible backup types. If you
choose one of them, you will then see any other elements or attributes in the design
view that are needed to provide values for that type of backup. You only
get these types of choices because the DB2 sample is created to show them to
you. Other sources of XML files may not be so good.
” values by typing a
value into them too. For example, in the Design view above, you can
change the “PathName” where your backup files land by adding a physical path
name to the right of the element. However, you change higher levels in an
element hierarchy by right clicking on them. If the element allows you to
change it, you will see the “Replace With” option as shown in figure 12.
You would then choose the element that you like in the next submenu. In
this case you get a choice of all of the possible backup types. If you
choose one of them, you will then see any other elements or attributes in the design
view that are needed to provide values for that type of backup. You only
get these types of choices because the DB2 sample is created to show them to
you. Other sources of XML files may not be so good.
Figure 12. Replace an Element in the Design View

You can also make any of these changes and more in the Source view. This view provides more flexibility, but also a greater chance that you can really mess up the file. That being said, I recommend that you view the file in the Source view because of all of the very detailed documentation it provides if included with your XML Files. For the DB2 Automatic Maintenance XML files the information in the comments is not provided elsewhere, not even in the Information Center. So even if you do not plan to use Data Studio to edit your Automatic Maintenance documents, I recommend reviewing the comments in the XML files for documentation of the values in those files.
Validate XML Changes
Once you have edited your XML file, it is a good idea to verify that it is well formed and that the attribute values that you chose are allowed according to the schema or XSD file. To determine if your document meets basic XML syntax guidelines such as verifying that every start tag has an end tag, i.e. the document is “Well Formed” you do not need an XSD. The validation can verify that with nothing but the XML file itself. However, for doing things like setting your automatic backup policy, you will also want to know that all of the element names are correct and that the values of attributes are valid and that requires the XSD file. For example, the only database backup modes are “OnLine” and “OffLine”. Entering a value of “OfflineXX” should cause an error.
By default the Database Administration perspective does not display the “Problems” view so we will need to add it manually so that we can see any errors that our XML changes cause. As shown in figure 13, you add the Problems view by starting at the top menu on Data Studio and then choosing Window | Show View | Other and that will bring up the Show View dialog box. Just type “problems” in the search box and choose the Problems view.
Figure 13. Show the Problems View

Now I am ready to cause some trouble. I’ve changed the mode to OnlineXX to exhibit an error as you can see in figure 14. I then right clicked on the XML file DB2AudoBackupPolicySample and chose “Validate” from the pop up menu. I then got a dialog box telling me that there were errors. Finally the actual errors showed up in the Problems view as you can also see in this figure. Data Studio generated two lines complaining about the OnlineXX value. It is a good idea to add an error to your XML file to see if the error gets flagged during validation to verify that the association to the XSD is working correctly. If there is a problem with the association to the XSD file then the validation will say that there are no errors.
Figure 14. Error on Invalid Attribute Value

Figure 15. Source View Error
 If you then click
on the Navigator view’s Source Tab and scroll to the section of the document
where the mode is defined, you can see that Data Studio also indicates that
there is a problem there too. As shown in figure 15, the offending value
is underlined and there is a red “X” marking the offending line.
If you then click
on the Navigator view’s Source Tab and scroll to the section of the document
where the mode is defined, you can see that Data Studio also indicates that
there is a problem there too. As shown in figure 15, the offending value
is underlined and there is a red “X” marking the offending line.
Once you have edited your Automatic Maintenance file and tested it for errors, you are ready to implement your policies using the stored procedures used to add these XML policies to the database. See in the Configure Automatic Maintenance DevelopwerWorks article for all the information you need for this task. Also don’t forget that you may need to change certain Database Configuration parameters to use Automatic Maintenance. Those are also described in this document.
***
To read more about the XML features of Data Studio, please see the Developing XML Applications section of the Data Studio Information Center. Using the XML example I give here you can also edit the XML files for creating Automatic Maintenance Windows as will as the Automatic Runstats and Automatic Reorg.
There are other interesting aspects of XML and Automatic Maintenance that I have not shown here. Please take a few minutes to click around and see what is available. Please add any features that you really like to my Facebook Page or my db2Dean and Friends Community and help the extended community.